Sally's Baking Addiction Chocolate Soufflé Review

I have checked out Sally's Baking Addiction for years. Any time I need a dessert recipe, it's one of the first sites I head to. Every month she features a baking challenge. This year, I've tried both of the recipes, but this post is about the Chocolate Soufflé recipe for February.

I've never made a soufflé before, but I've certainly watched the French Chef episode where Julia Child makes a cheese soufflé plenty of times, and it didn't seem overly scary, so why not give it a try with this chocolate version. I'm not usually afraid of dealing with egg whites. I haven't done it many times since the recipes I usually use don't include whipped egg whites, so maybe it's just false confidence, but the worst I can do is beat the crap out of them and ruin it. It helps that this was only for the two of us, and if it didn't work out, we had ice cream in the freezer!

Sally's directions on the blog are fantastic for someone who has never attempted a soufflé before. There are notes on where you might hit a snag and helpful tips for completing the recipe.

I didn't have the perfect ramekins for the project, so I went with my 7-ounce Corningware dishes. They have a wider lip, so I didn't get the impressive picture with the lift, but I can tell you that the soufflés did their thing and rose, even if you can't see it in the finished product. If I were to make these for company, I'd get the right container.

There are only two of us, so I decided I'd also take the recipe's tip for preparing ahead of time. We had the first pair on Saturday night and the second pair Sunday night. I thought this would also be a great way to test the make-ahead aspect of the recipe.

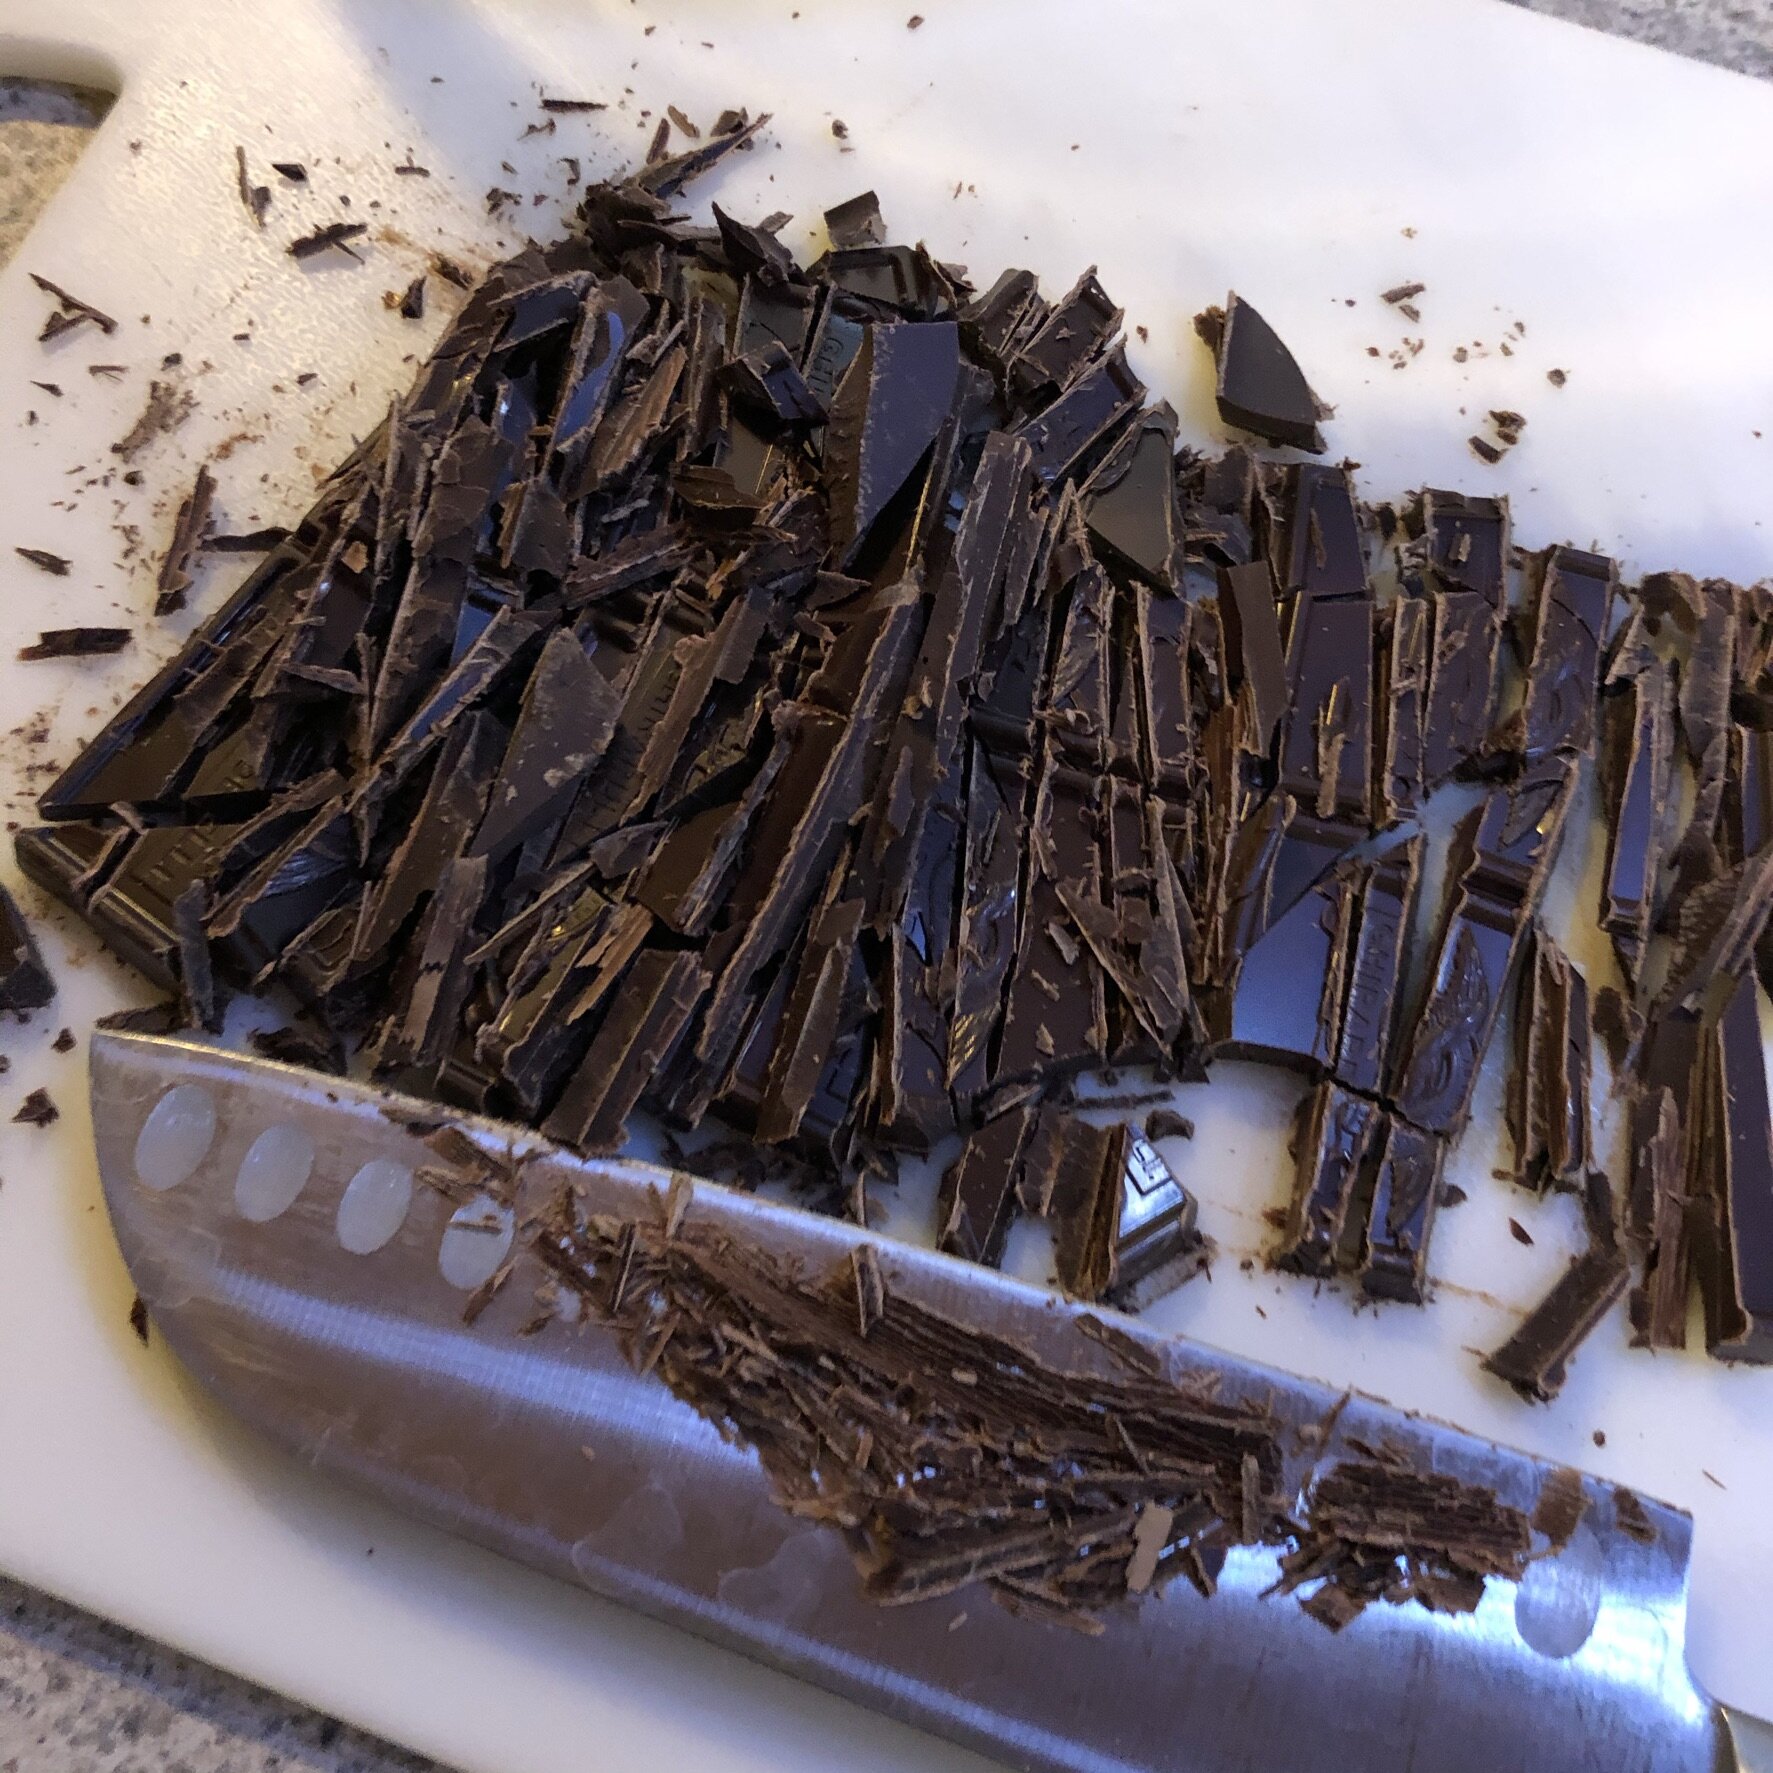
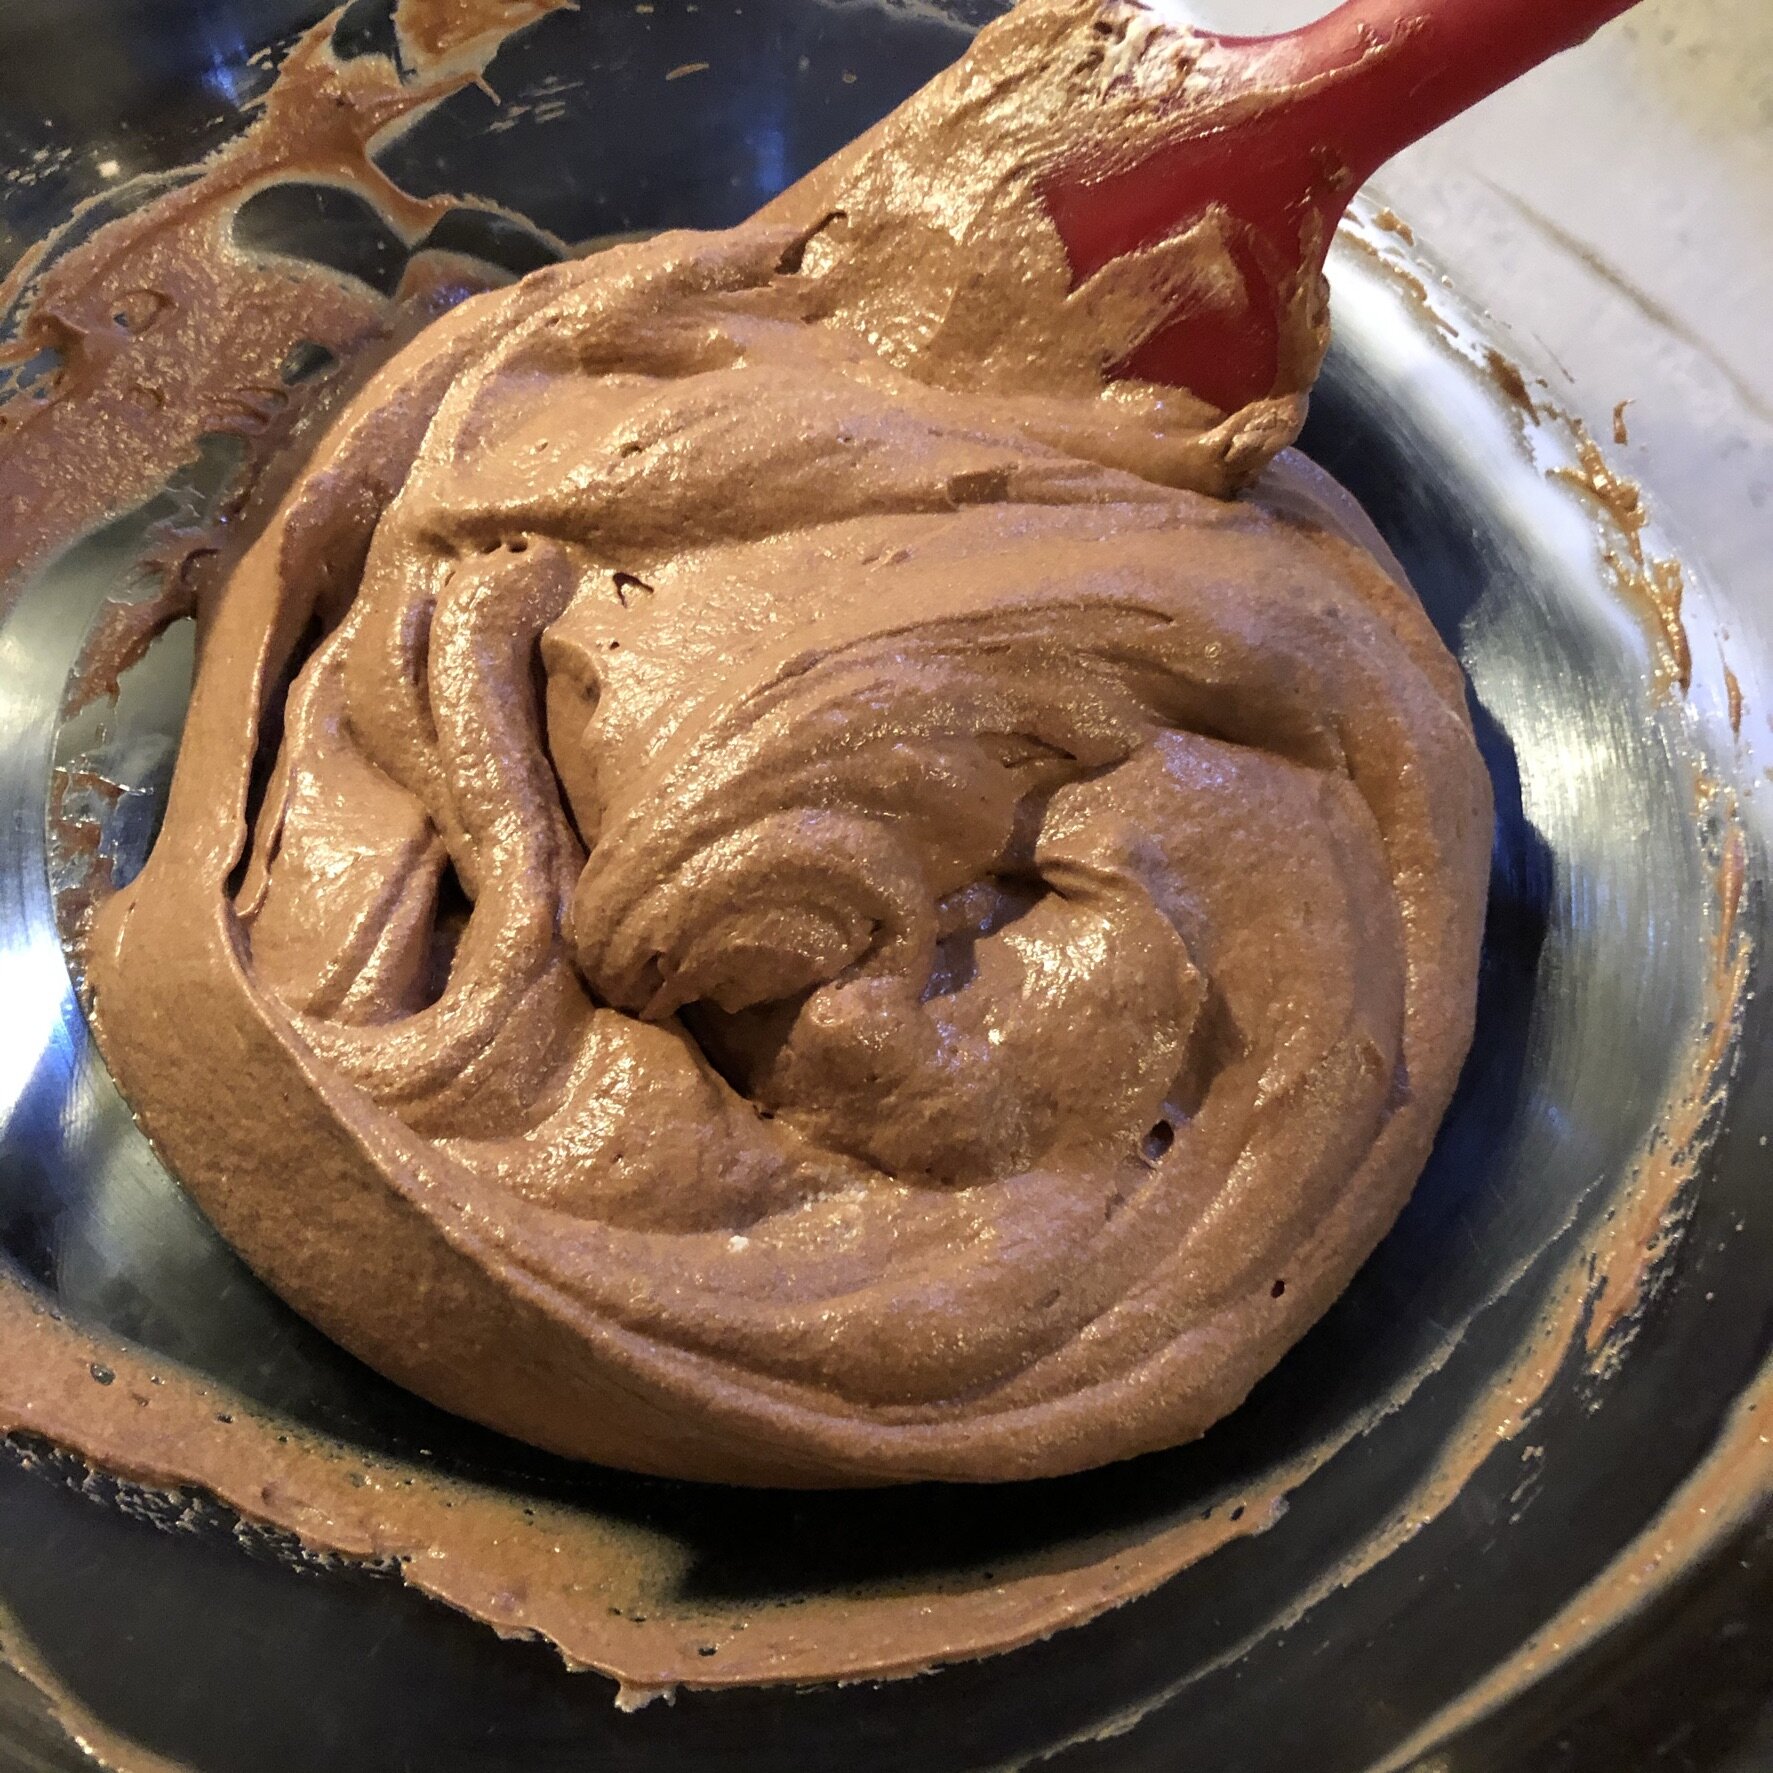
With the clear directions, the mixture came together quickly. I was surprised how fast it went. For the chocolate, I used a Ghiradelli semi-sweet bar from the baking aisle. I've used the Ghiradelli bars many times and have always been pleased with the chocolate flavor.

IMG_3877.JPEG

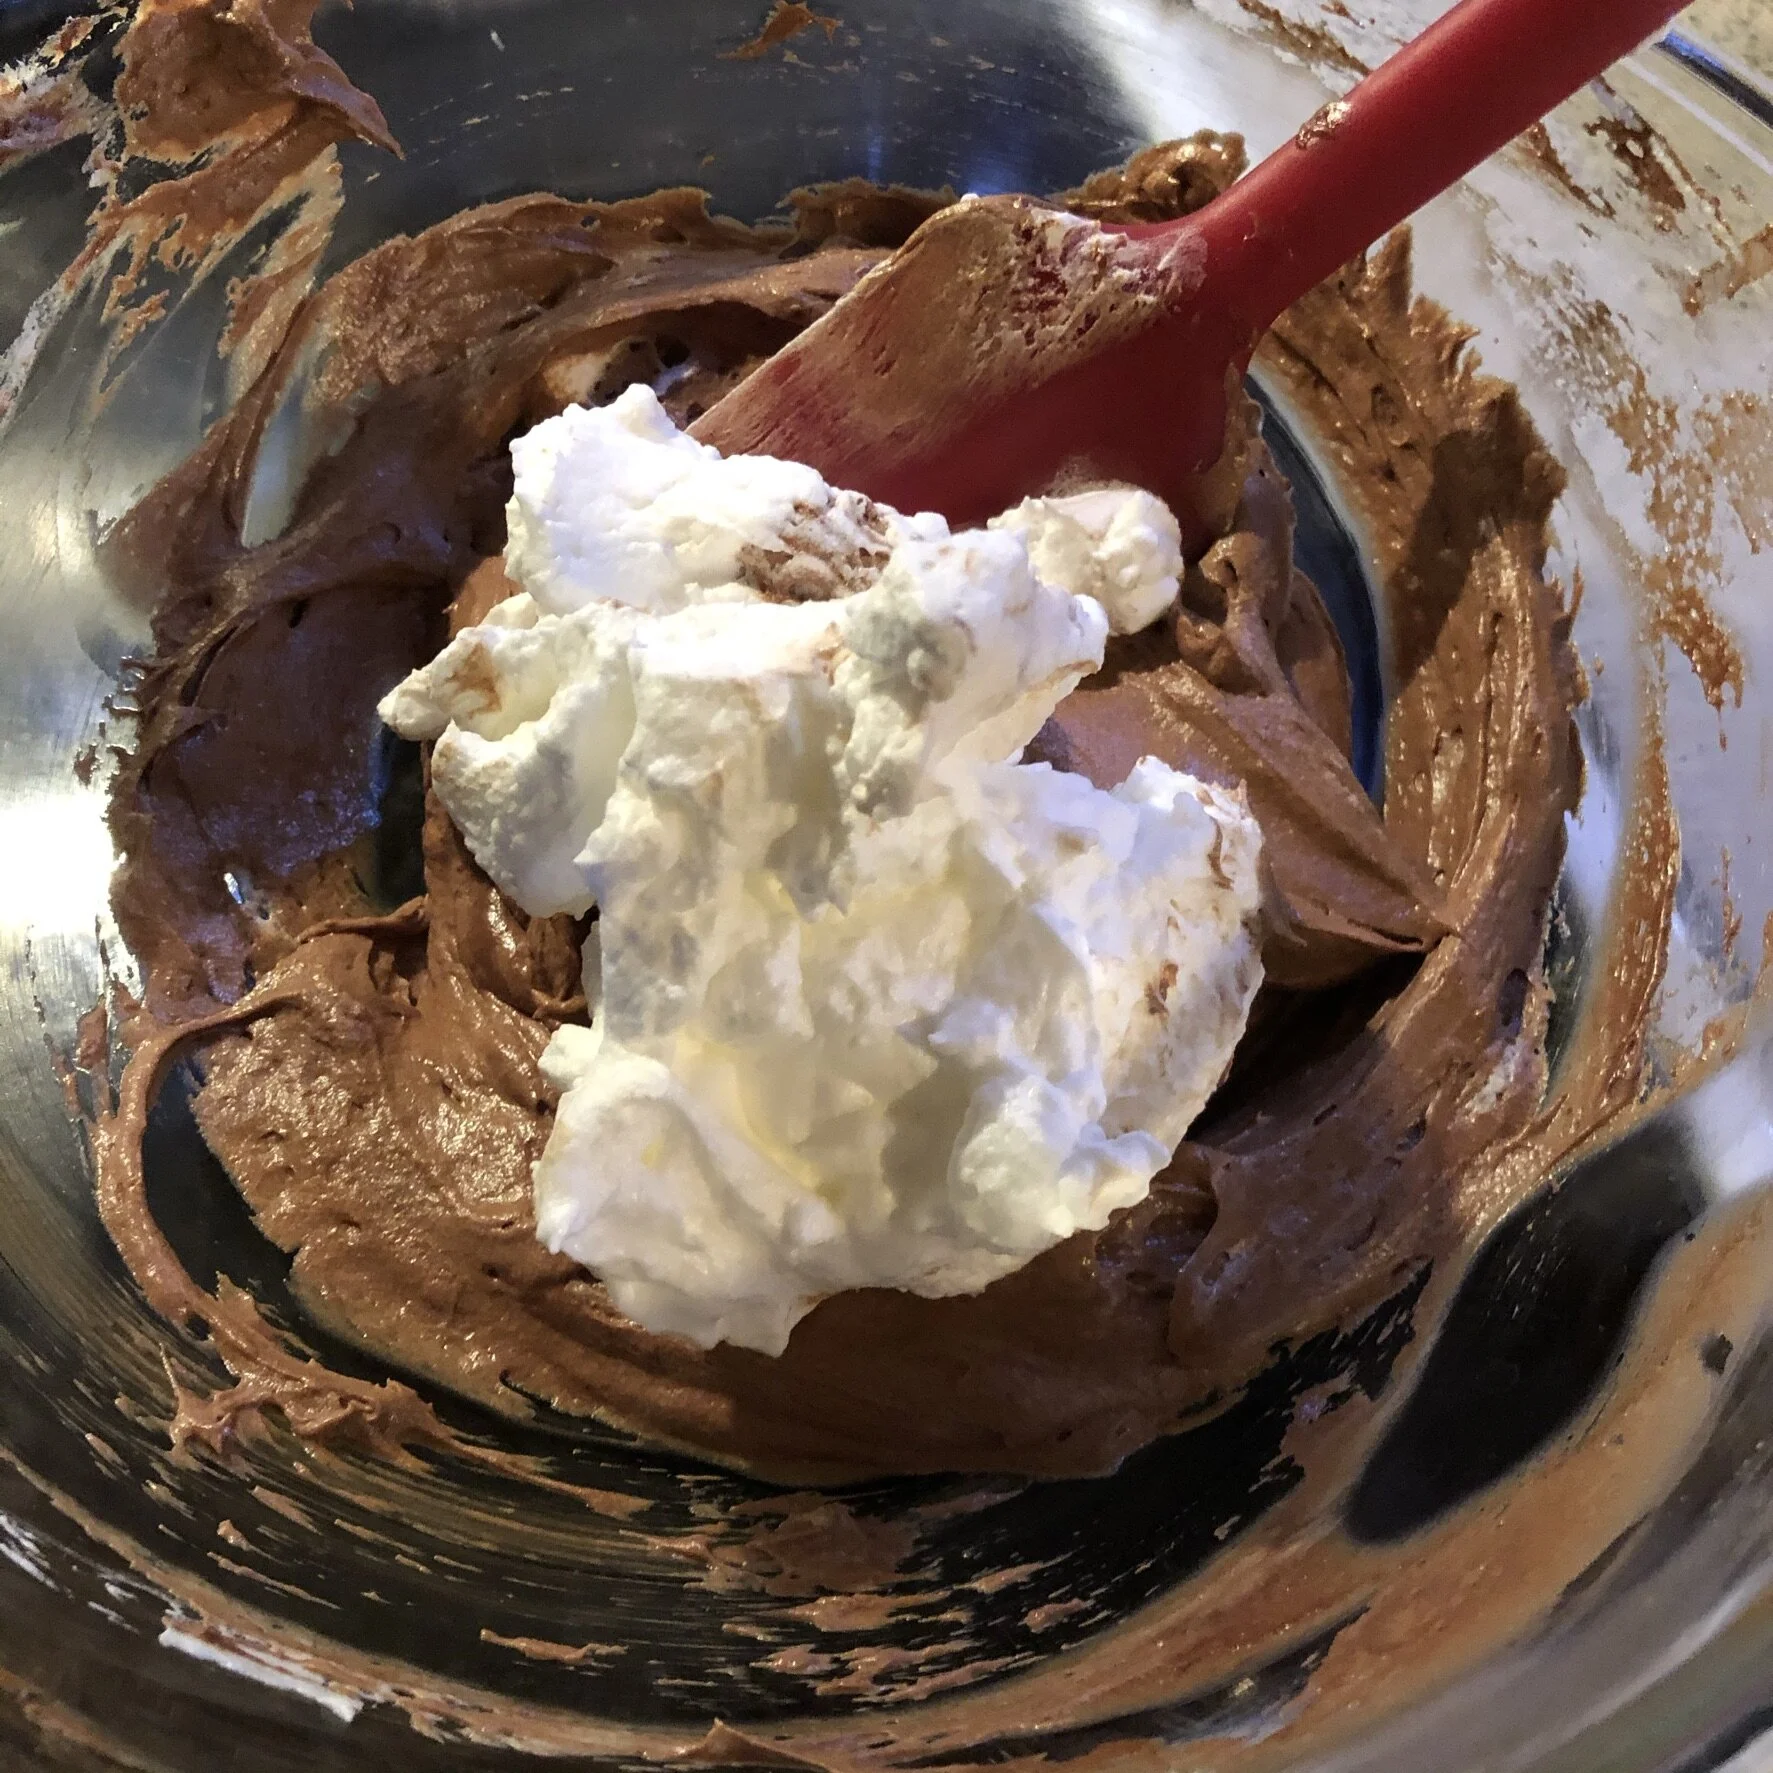
I did use my Kitchen Aid Stand Mixer for the egg whites, because why wouldn't you? I added the egg whites in three additions as the recipe recommended. I was a little nervous about deflating all of the air that I had worked into the whites, and it stayed light and fluffy. The finished mixture was smooth and shiny.

I spooned the mixture into the dishes and added the channel that the recipe recommended in the recipe. I'm not sure it helped because of my containers' shape, but at least it was practice. Then, I covered them all with plastic wrap and put them in the fridge until later. When it was time for dessert, I preheated the oven and placed two dishes on a baking sheet. I ended up baking the soufflés for about 16 minutes. Since I've never baked one before, I wasn't sure exactly how much jiggle it should have, so I erred on the side of less jiggle.

IMG_3881.JPEG

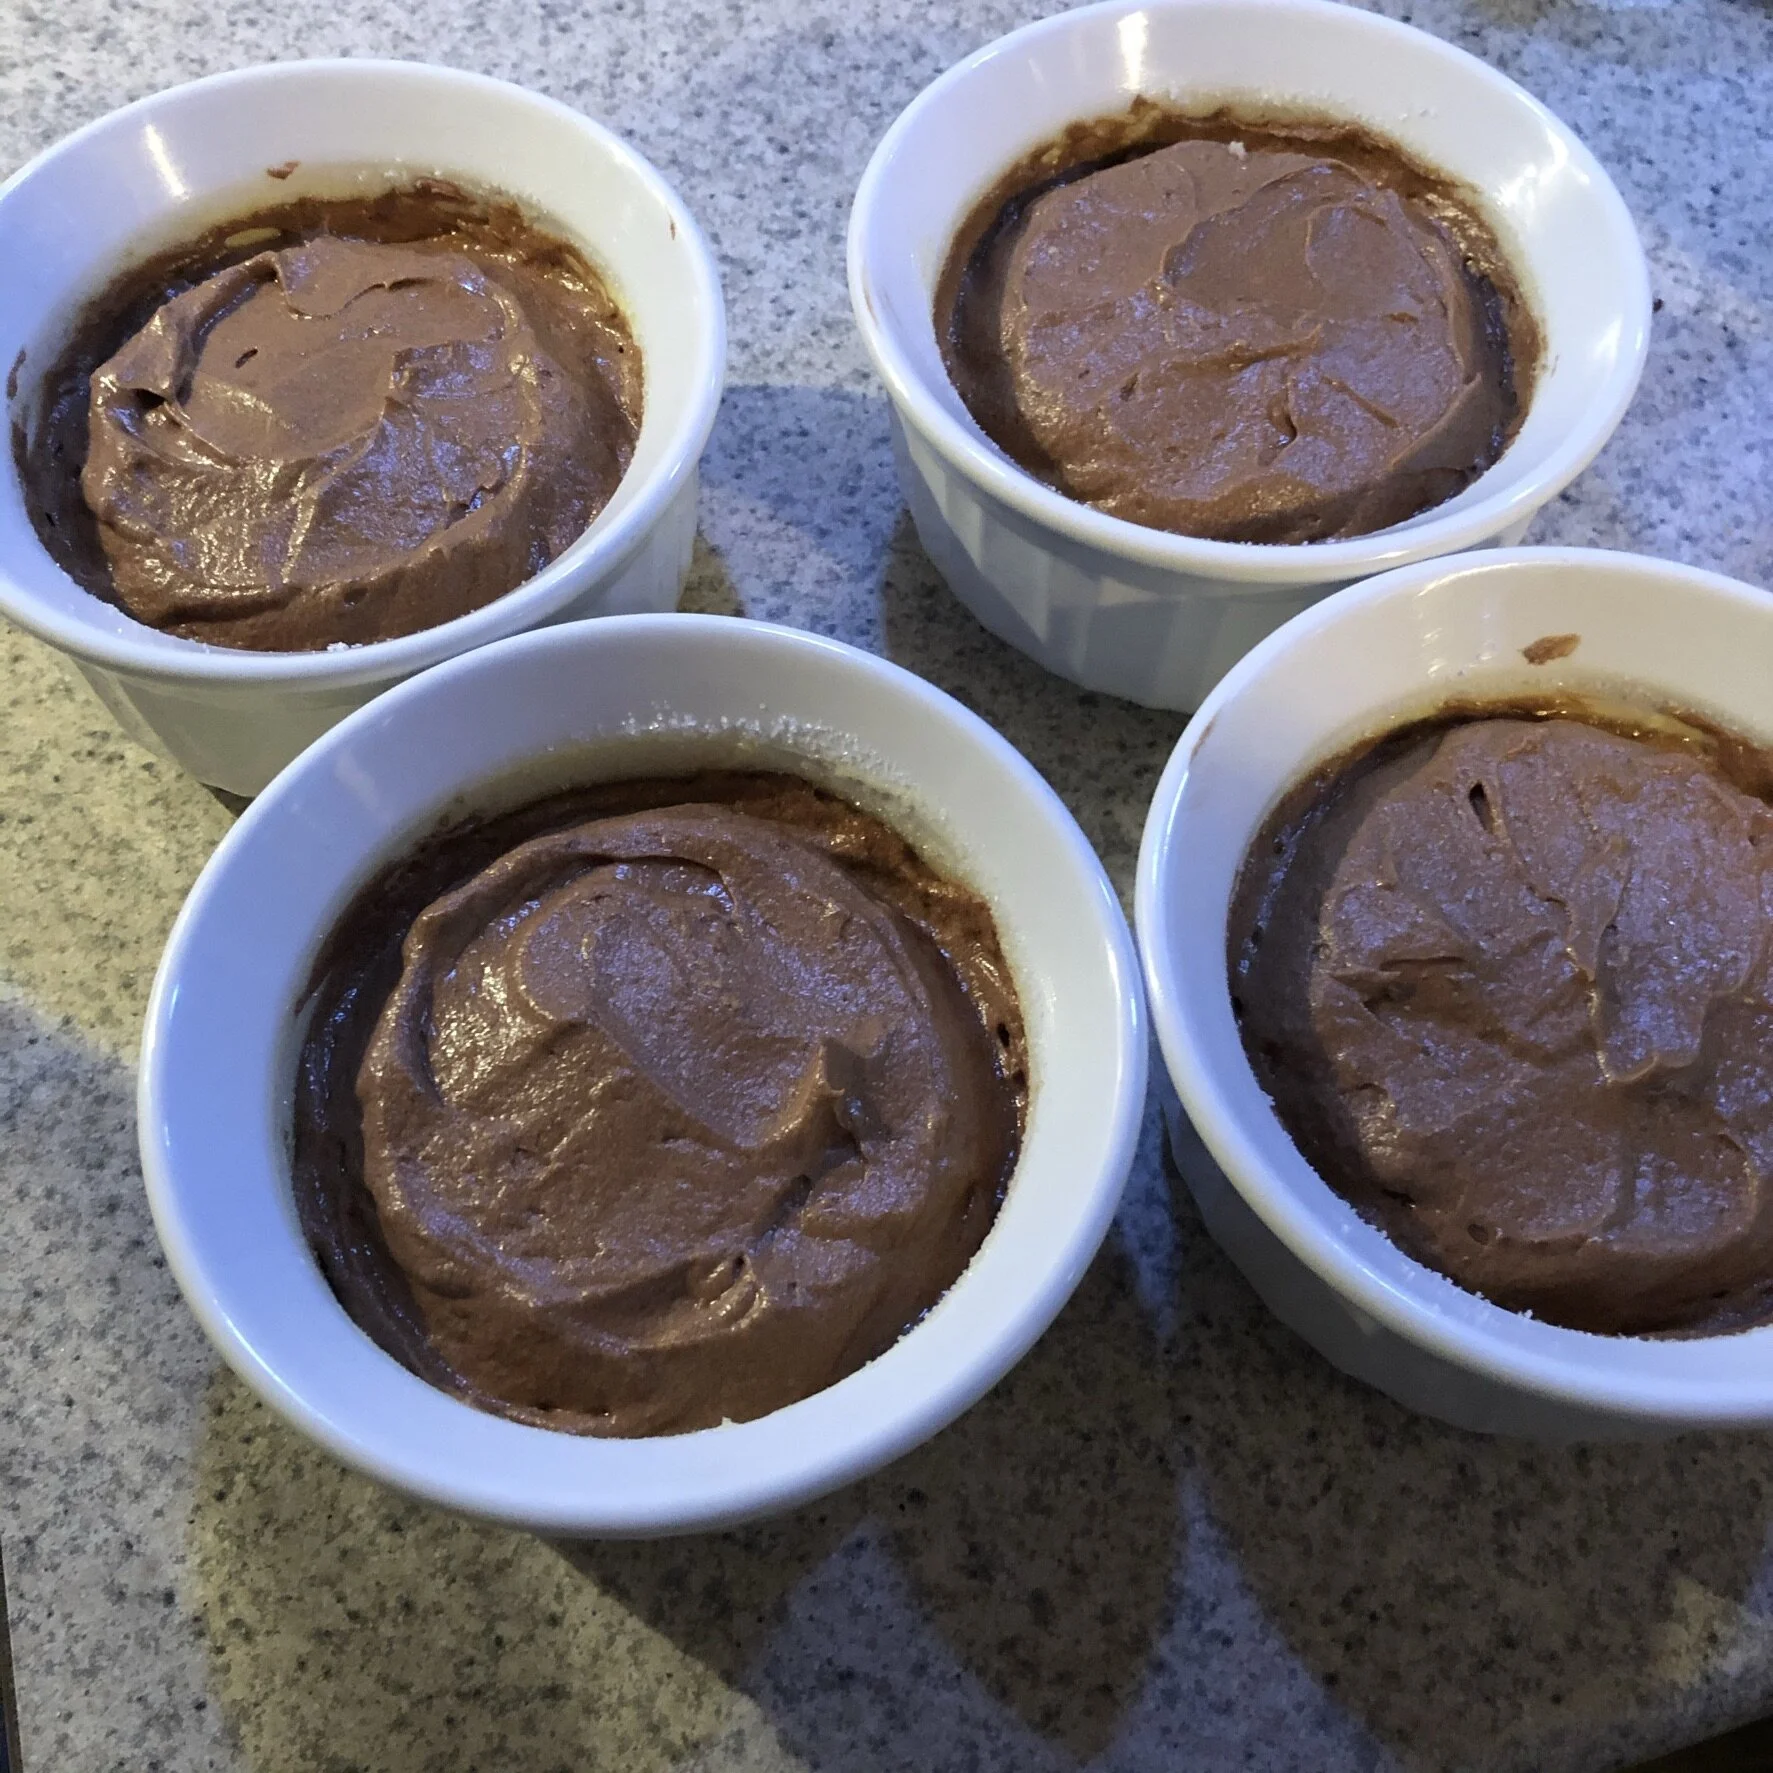
As you can see, the soufflés did mushroom just a little bit, but again, I think that's 100% a function of the dishes that I used. I'm confident that if my dishes only had straight sides all the way up, I would've had the straight sides that the recipe shows. I did sit in front of the oven and watch as they baked. It's just like tv, right? I was a little worried that it didn't seem to be doing much for most of the time, but in the end, it puffed right up.

IMG_3891.JPEG

We had the soufflés with homemade whipped cream (just heavy cream, a sprinkle of sugar, and a drop of vanilla extract) and raspberries. I felt like the raspberries were an excellent way to cut the intense chocolate flavor, but my partner wasn't too thrilled with the seeds in his teeth. The next day, he nixed the raspberries. We were both impressed with the finished dessert, and while there isn't much that I've made that he hasn't liked, he said several times how much he enjoyed these chocolate soufflés.

chocolate souffle

I would definitely make this Chocolate Soufflé again! If you're at all nervous about making them, just go for it. The directions are clear and easy to understand, and if you don't try and maybe make a mistake, how can you get better?

IMG_3894.JPEG

King Arthur Baking Perfectly Pillowy Cinnamon Rolls Review

I love cinnamon rolls! I don't usually make them because they're a lot of work, and there's a lot of waiting, which when you want cinnamon rolls, that's not something you want to do. King Arthur Baking announced their 2021 Recipe of the Year at the end of December. Last year, it was pizza, and this year, as I'm sure you can imagine, based on my introduction, is cinnamon rolls—Perfectly Pillowy Cinnamon Rolls to be precise.

I gave these a try a couple of weekends ago. They are different than most of the cinnamon rolls I have made before because they're not all squished into a pan, making it harder to get an even bake. Don't get me wrong, I love a squishy center, but sometimes it's a little too much. You bake these cinnamon rolls on a sheet pan, so none of them are touching, which means you get a nice, lightly browned outside and a soft, not underbaked center.

The cinnamon rolls use the tangzhong technique. In this technique, you cook flour and water into a slurry and mix it into the rest of the dough. It does many things, including making the finished bread moister and stay softer longer, hence the pillowy title. I'm familiar with this technique because I started using it for my preferred dinner rolls that I make on holidays, Buttery Pull-Apart Buns. They stay soft for days after the holiday.

The dough came together quickly in my Kitchen Aid mixer. Sometimes I don't mix the dough long enough when using the mixer, but I've started going at least a minute longer than I think that I'm supposed to go, and that seems to have improved my dough.

After the first rise, I set to rolling out and rolling up the dough. The dough is incredibly soft, and I didn't even have to use a rolling pin to get the dough into a rectangle. It didn't snap back too much and stayed nice and relaxed. I added the filling and rolled up the dough. I always seem to have a little trouble with the rolling part, whether it's bread, stromboli, or something else. It usually ends up a bit of a mess. I did the best I could with these. The only floss I have is mint, so I just used a knife to cut the rolls. I picked my sharpest knife, and it worked out well.

IMG_3659.jpg

I did lose a little filling transferring the rolls to the baking sheet. Not enough to make a difference, but it was just a little messy. I tucked the end under the roll as suggested in the recipe. After they were all on the baking sheet, I sprayed some plastic wrap with cooking spray, covered the rolls, and let them hang out for a second raise.

IMG_3662.jpg

When they had puffed, I put them in the oven and waited for the timer to go off. I took their temperature to determine if they were done. As with cooking, I feel like this is the easiest way to know if they're done. They looked beautiful, and I'm super happy with how they came out.

IMG_3663.jpg

I firmly believe that cinnamon rolls should have cream cheese icing, so I went with the recipe noted at the bottom. It was delicious, though I think next time, I might add a hint of lemon to it, just to brighten it up a bit.

I did say next time, so yes, I'll be making these cinnamon rolls again. They were easy, fun, and of course, delicious. I ate them for the rest of the week, and they stayed soft the entire time.

IMG_3664.jpg

Almond Poppyseed Cake from Claire Saffitz Review

Perhaps it's time for a little "flour" content in with all this fabric. When Claire Saffitz announced she had a book coming out, I hopped right over to Amazon and pre-ordered it. I love cookbooks. I try not to buy too many because I don't have the time to make everything, nor do I have the shelf space, but I love cookbooks. I love flipping through them, I love the photography, and I love just reading the content and recipes. I did decide Dessert Person needed to be on my shelf, though. I love Claire, and I love dessert.

IMG_2927.jpeg

When I received it, I flipped through it many times. I wanted to make everything. As often happens with me, the book offered me too many choices, and I didn't know where to start. So I set it aside for a while. Shortly after that, I discovered that Claire has a new YouTube channel. She's showing off tips and tricks for the recipes from the book. Not only that, but her cat Felix makes several appearances, and I'm here for it!

Last week's episode was Claire's Almond Poppyseed Cake. Over Christmas, I attempted to make my grandmother's poppyseed bread and failed miserably. I have a recipe, but it's not directly from her, so I'm not sure how accurate it is. I do have some ideas to edit this recipe to make it more like hers, but I've moved on to other poppyseed items for now. I was a little anxious about this cake since it you bake it in a Bundt pan, and I can count the number of times I've had a Bundt come out cleanly on zero hands. It always ends up falling apart no matter how I grease, flour, pray to the Bundt gods, and it always makes a mess. Claire did note in the video and in the recipe that you can bake this in two loaf pans, but where's the fun in that?

To do everything I could to prevent the dreaded sticking, I did what Claire did in the video. I used a neutral oil (vegetable), brushed it all over the pan, and then coated it in flour, gently tapping out the excess. I've done the shortening/flour technique for years before baking spray was a thing, it is how my mom taught me to handle pans, specifically for cakes, so I have experience with it. As I finished and set the pan aside, I stared at it skeptically and said, "Please release the cake when the time comes." Then I moved on to gathering my ingredients.

IMG_3589.JPEG

I've gotten better over the years at the mise en place thing. Everything progresses more smoothly with baking and cooking when I have everything already set out and ready to go. Sometimes it feels like I'm wasting dishes, but I have a dishwasher, and if the Finish commercials are correct, it takes less water to run the dishwasher than washing the dishes by hand. It's probably reasonably accurate given how I wash dishes when I do it by hand, so if I use a couple of tiny bowls in exchange for sanity and ease, I guess that's okay.

This is a beautifully simple cake. I knew from watching Claire's video that it's not the most complicated recipe that she has, and the book has difficulty levels assigned to each recipe, and this one is labeled "very easy." Dessert Person also features a unique recipe matrix that compares time to difficulty. I probably shouldn't admit this, but I have hugged this book several times because I love it so much.

There is no creaming, no sifting, no whisking all the dry ingredients together, unlike many cakes. You just put the dry, turn on the mixer a couple of spins, turn it off, and add the wet ingredients all at once. You then beat it for a couple of minutes, and it makes a beautiful, soft, silky batter. I've mentioned before that recipes that call for softened butter aren't always my favorite. This is mostly because I don't like waiting for butter to soften, and if I try to speed it up, I make a mess of it.

IMG_3591.JPEG

I poured the batter into the prepared pan, and it looked a bit more full than it should be, but I went ahead with it anyway. As I watched it bake (I didn't have an oven with a window growing up until I was closer to a teenager, so it still thrills me to turn the oven light on and watch things bake.), I realized that perhaps I should've double-checked the capacity on my pan. I'm pretty sure it was a 10-cup Bundt, and the recipe calls for a 12-cup Bundt. I didn't have any spill-over. My Bundt just ended up having a domed bottom, not a big deal in the long run. The cake finished in the amount of time given in the recipe, which surprised me since there is a lot of batter here. I took it out of the oven, gave it another look, and asked it to please come out of the pan in 15 minutes.

IMG_3593.JPEG

After 15 minutes passed, I took my offset spatula, stabbed around the edge of the pan, put my cooling rack on top, flipped it over, lifted the pan, and....cake still in the pan. I flipped it back over and more aggressively dug around the outside with the offset spatula in hopes that it would separate from the pan. I went through the process again, flipped it over, and the cake came out! In one piece! I stabbed the cake all over with a bamboo skewer and brushed on the glaze.

IMG_3601.jpg

Then, I had to wait until it cooled to try it. This was hard, but luckily it came out around the time I needed to start making dinner, so I had enough to distract me from the delightful smelling cake. When it was finally time to taste the cake, I was thrilled! This cake is delightfully light and fluffy. It has a delicious flavor, and the bites that had the edges with the glaze were my favorite. The soft inside balanced so well with the flavorful edge. Since there was a lot of cake here, I shared it with my parents and sister, and they all agreed they would happily eat it again. And, I would happily bake this one again!

IMG_3605.JPEG

Since I've had the book, I've made one other recipe from it. I'll come back and chat about that one soon. If you love desserts and/or baking, I highly recommend Dessert Person by Claire Saffitz.

Recipe Review: Cinnamon Swirl Quick Bread

It's been so long since I baked anything; I was afraid that I forgot. Luckily, I have not! Yesterday, I had a go at Sally's Baking Addiction's September Baking Challenge, Cinnamon Swirl Quick Bread.

IMG_2589.jpeg

I love quick bread. Well, I love all bread, but a quick bread is one of my favorites to have on hand for breakfast. They're usually fun to make, reasonably simple, and often taste delicious. I've tried all manner of quick bread, from banana to apple to pumpkin to chocolate chip. I can remember when I was much younger (when I was old enough to use the oven with supervision), I would make quick bread with a Pillsbury mix. I'm certainly not opposed to mixes (I have several cake mixes in the pantry right now, and often have King Arthur Baking Scone mixes on hand, too), but these recipes are usually nearly as simple as a boxed mix.

I especially enjoyed this recipe. Obviously, I love the delicious taste and texture that comes from including butter, but sometimes I want to get to baking and not wait until the butter softens up. This Cinnamon Swirl Quick Bread uses oil, sour cream, and milk. Things I always have on hand! Because I was tired while baking, I didn't follow the directions to a T, and even then, the bread came out delicious. I appreciate that the recipe used weight measurements because I find it easier to weigh everything.

The cinnamon flavor in this is quite strong. Partly because it uses a full tablespoon, and partly because my preferred cinnamon is the Vietnamese Cinnamon from King Arthur Baking. It has a slightly sweet flavor and a delicious spiciness.

I'm definitely adding this recipe to the few I keep when I want to whip up a quick breakfast or snack.