FFO: Country Cottage Needleworks January Sampler

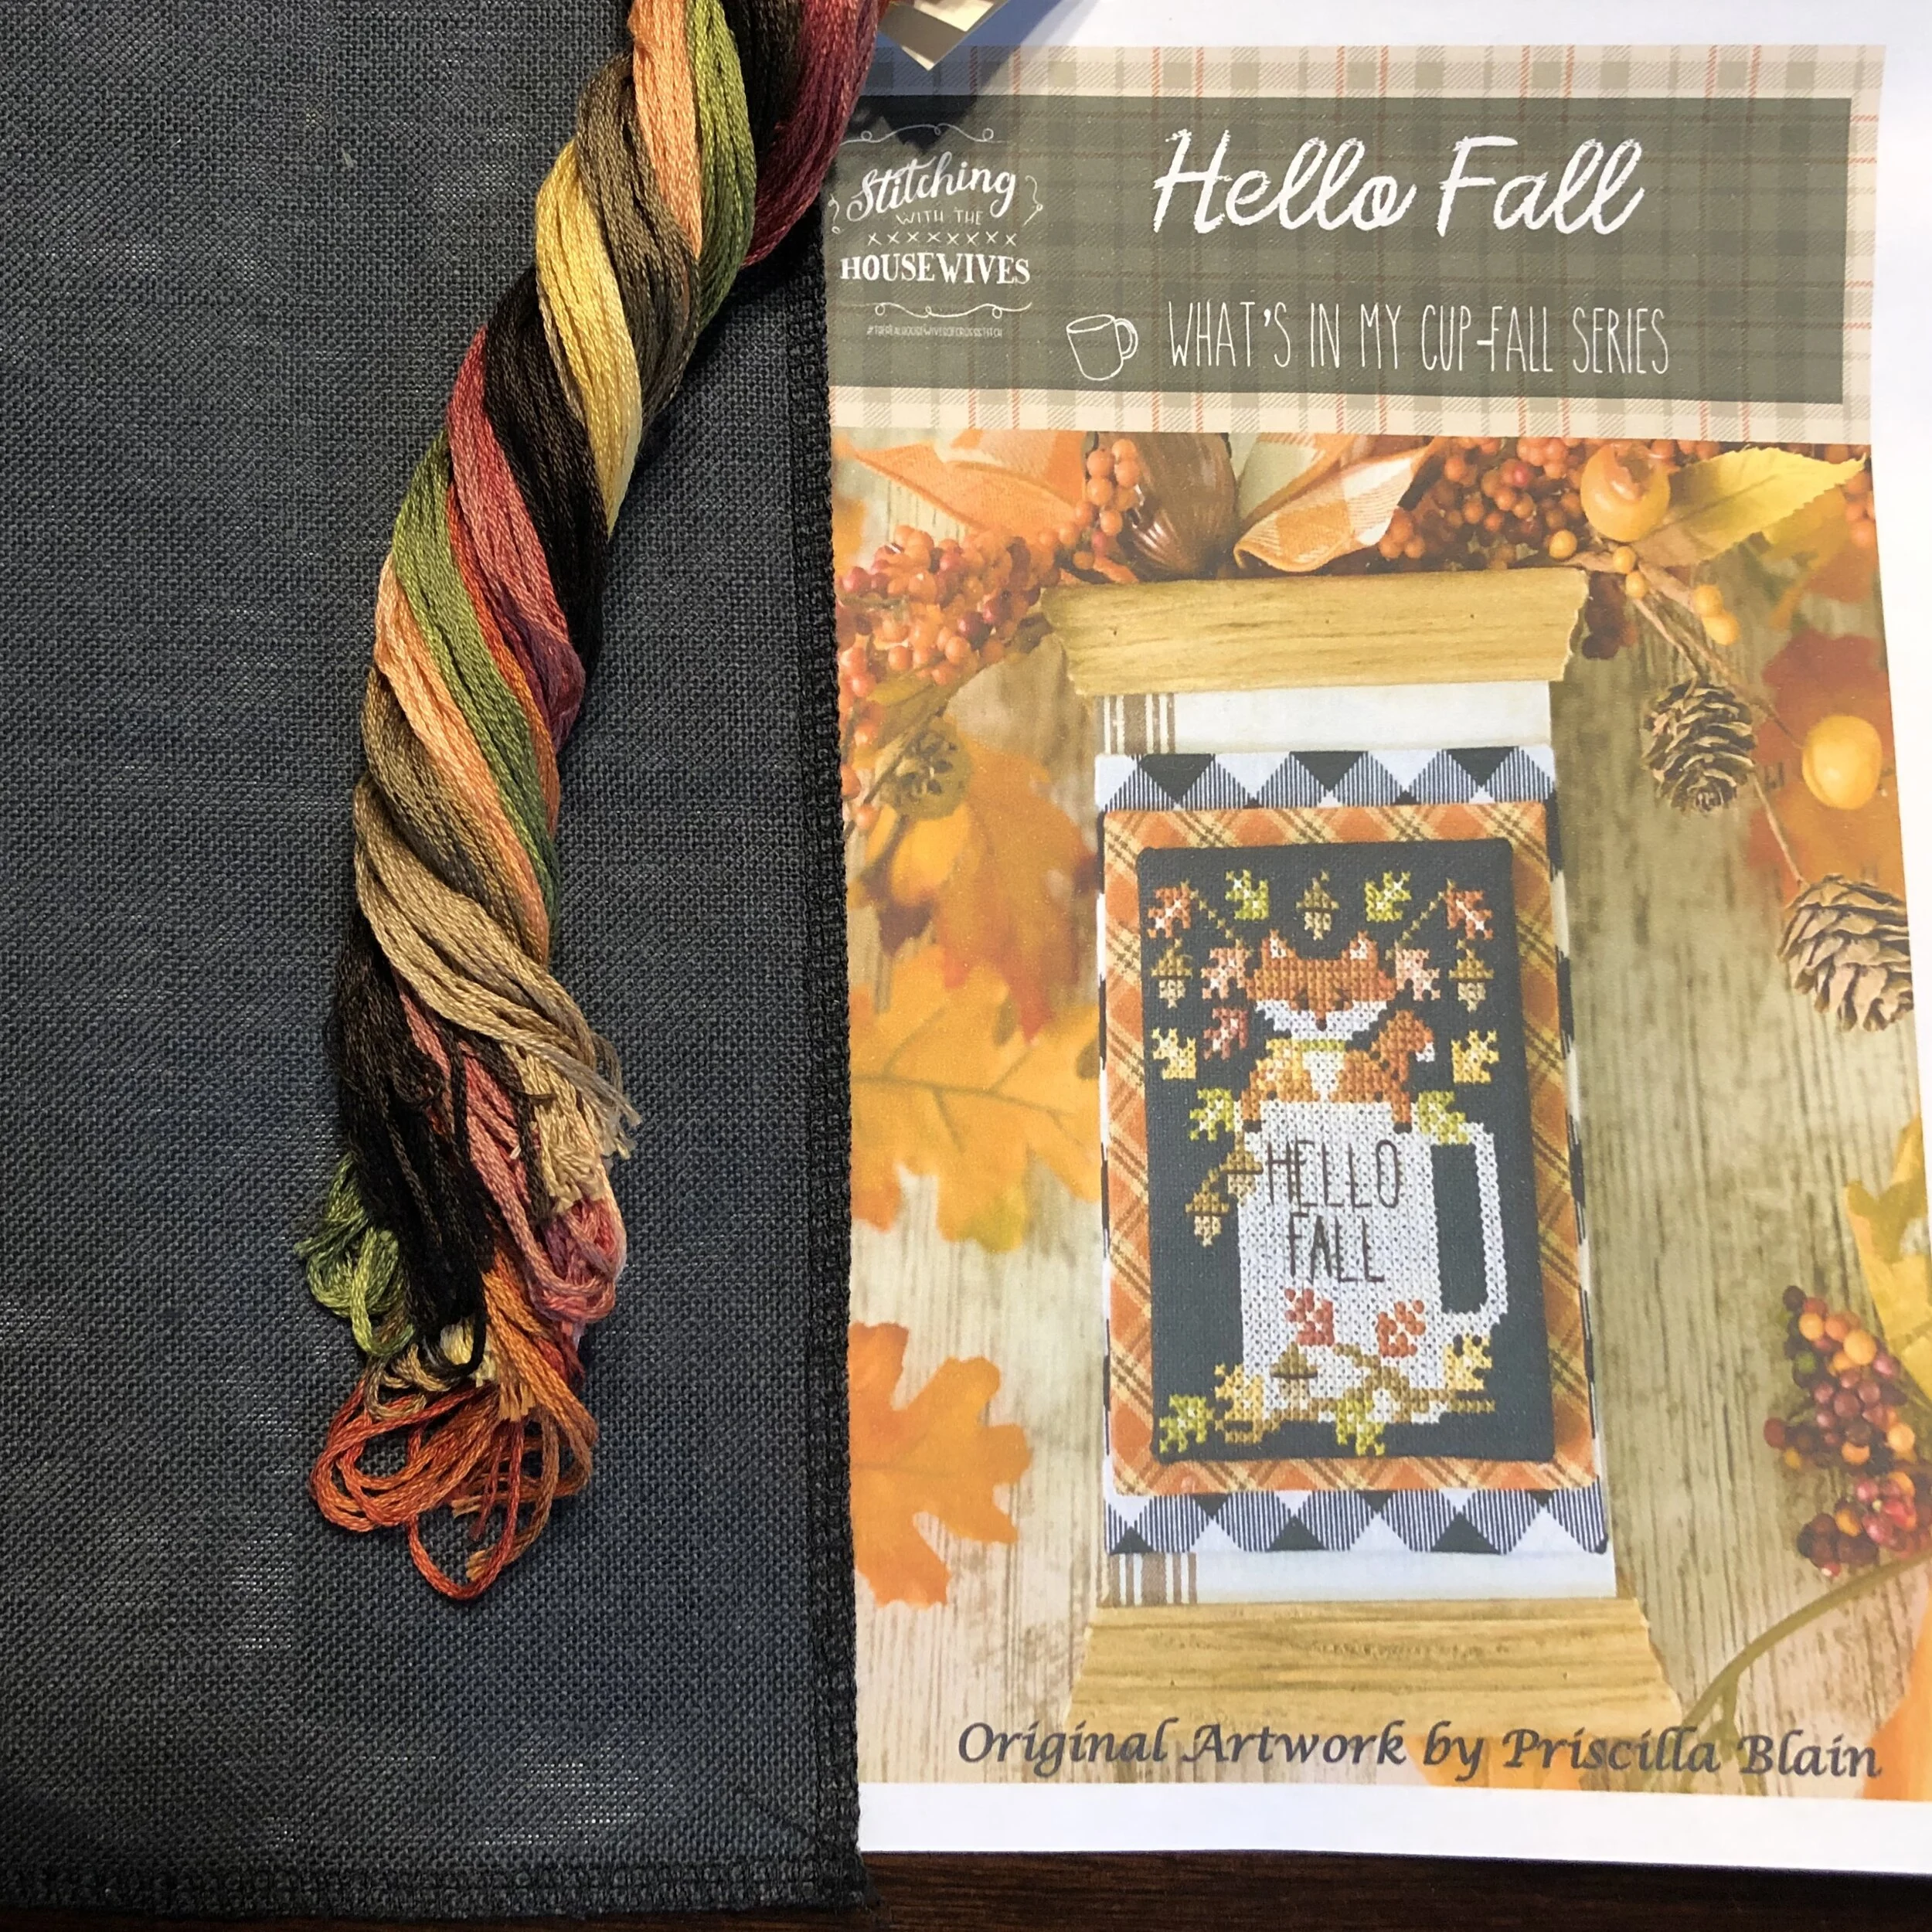
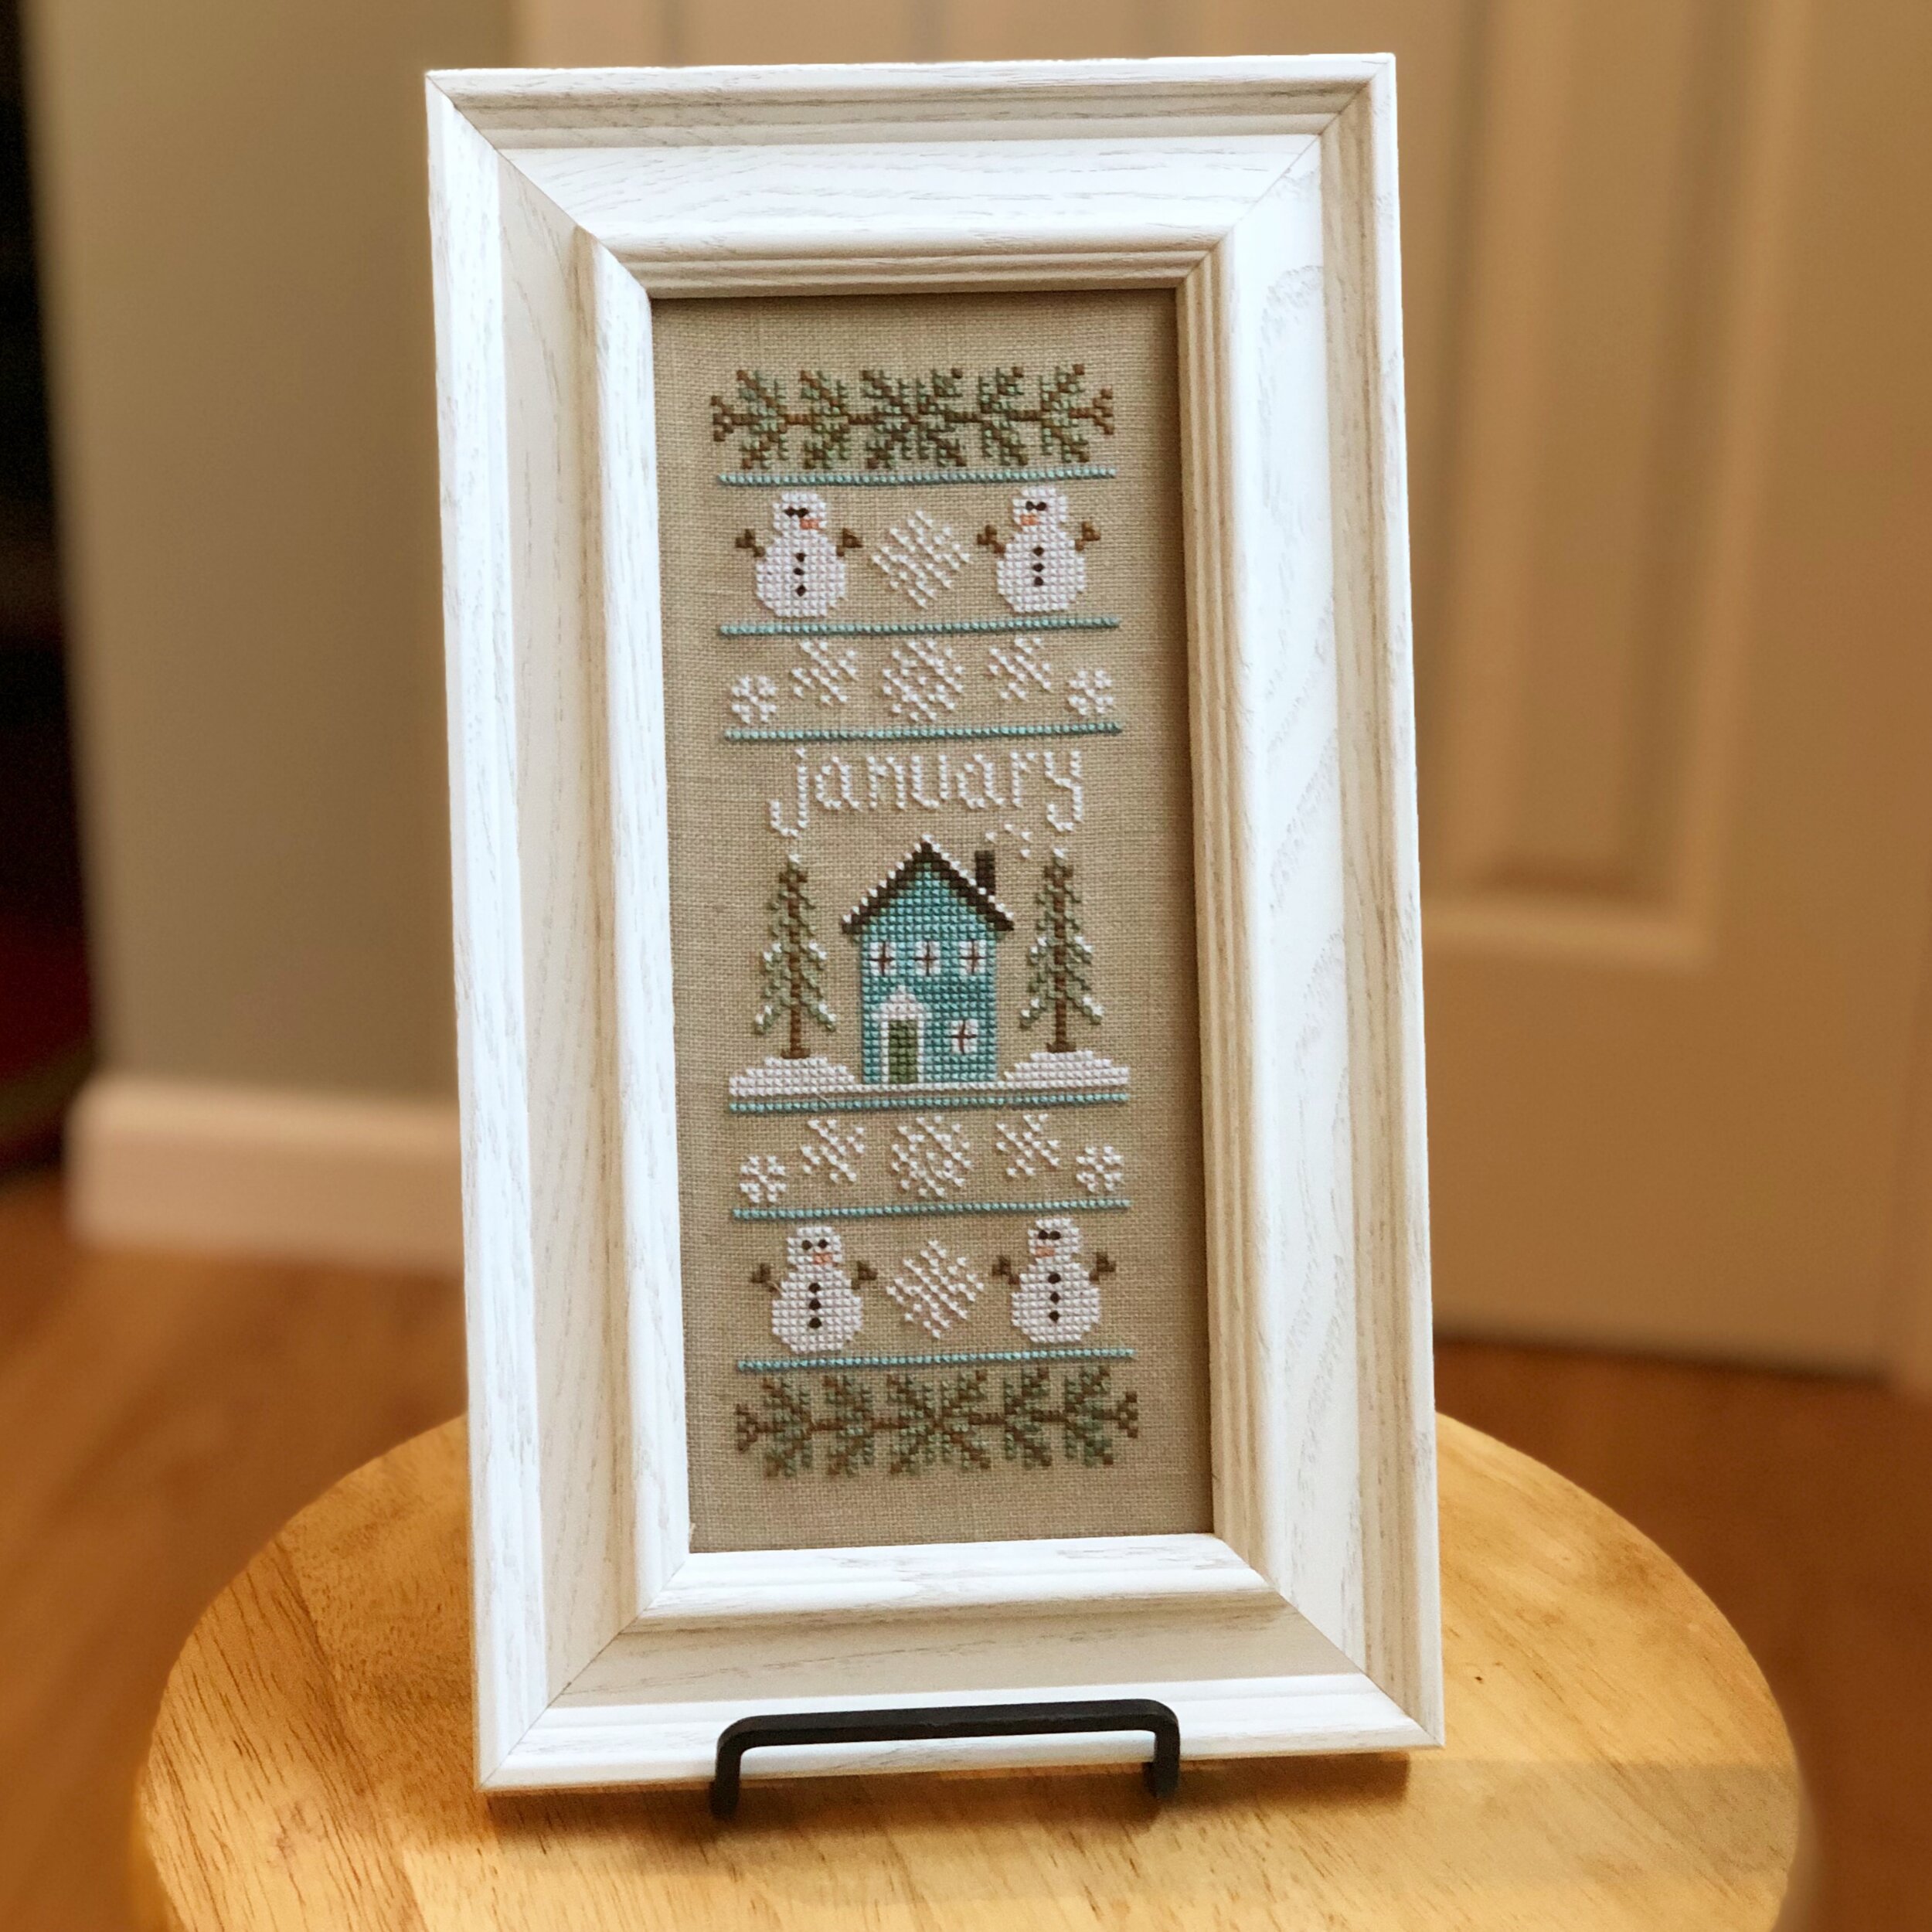
When I saw the preview of the Country Cottage Needleworks Sampler of the Month posted on Instagram, I knew that there would be another new year-long project on my list. There was something so appealing about the size, shape, and colors of the January pattern that I couldn't resist. When Fat Quarter Shop announced a monthly club, I signed up right away. I chose the 32 count linen club since I prefer linen or evenweave to Aida.

The pattern calls for (and the club comes with) Wichelt 32 count linen in beautiful beige and floss by Classic Colorworks. I have completed or have in progress a few patterns from Country Cottage Needleworks, so I'm familiar with their pattern layout. The patterns are in black and white. Sometimes if my eyes are feeling a little tired, I will take some colored pencils and color in black and white patterns for easier stitching, but this time, I left it as is and didn't have too much trouble keeping track of the colors and stitches as needed.

63133166492__F21CF56B-3C04-4A86-9446-E37F50D474F7.JPEG

I love the way the Really Tealy Classic Colorworks gives the house an icy vibe. I had recently completed a different Country Cottage Needleworks pattern that was winter-themed (which I'll show on another day), so it was nice to have the snowflakes be the same. I didn't have to re-learn how to do them.

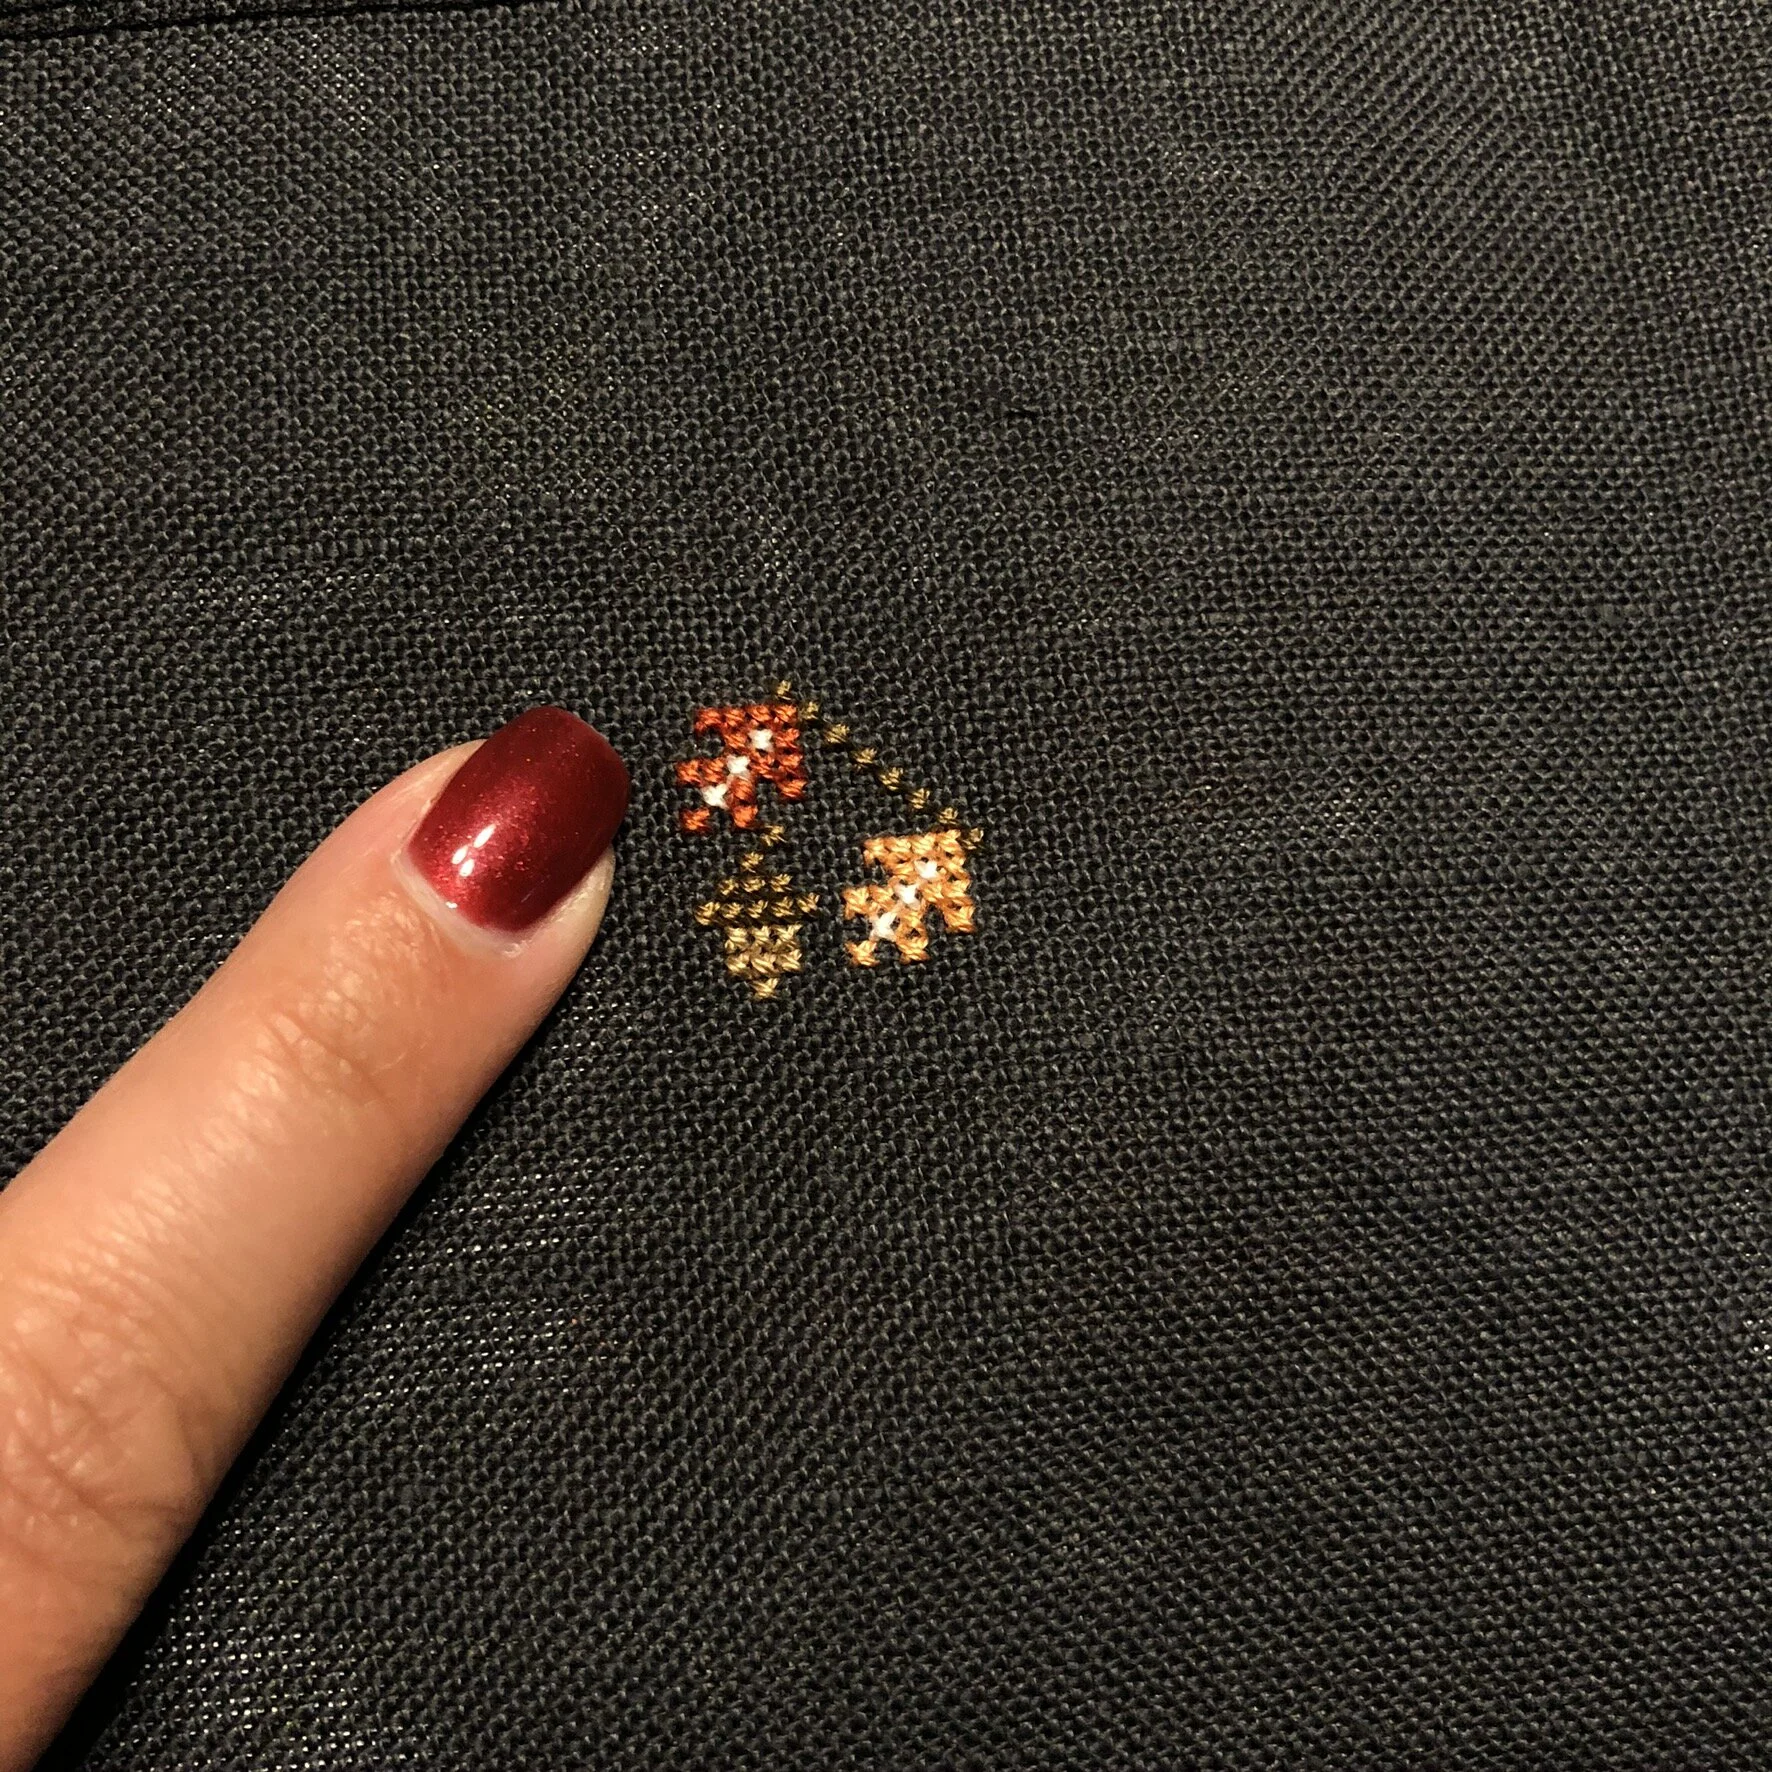
It was a pretty quick stitch. It only took me about 18 hours to finish, and I enjoyed every stitch. The linen is imperfect, so some Xs are a little larger than others, but that's the way it is when working with linen. I mostly stitched one X at a time, even though it's faster to go across in one direction and back in the other.

I wasn't sure what I was going to do about a frame for this piece. It is finished on the pattern cover with a 4" x 9" frame from Family Tree Frame Co. It is a lovely frame, but it's not quite my style. It has a little too much going on for my taste, so I did some searching, first on Amazon, and came up with nothing. I then went to Google and stumbled across ArtToFrame.com. They seem to have a huge selection of items that I've only scratched the surface of, but most importantly, for this project, you can order any frame size.

Since I had not heard of them before, I was a little leery about ordering but decided the worst that would happen is that I'd be out a little bit of money. I typed in my inner frame dimensions and was shown a variety of frame options. I think there was a color or style that would work for anyone. I was pretty excited that they were affordable too. The base price of the one I selected, an off-white stain on solid wood, was just over $20. You can then choose the type of glass you want, from a basic plain glass up to museum glass. I selected something in the middle for this, TruVue Conservation Reflection Control, which reduces glare and protects from UV light. You also get your hardware choice, a simple sawtooth, easel back, a wire option, or easy hang. I went with the simple sawtooth since I was planning on using an easel from Amazon to rest this on.

It took about three from ordering to shipping, though I did order on a Sunday, so I wouldn't count that as a day. The shipping step of the way is where we ran into a delay. ArtToFrames ships from Brooklyn, NY. I live in western Massachusetts, so that's only about three hours away. Well, the frame went on quite the adventure with USPS. Instead of traveling directly to the closest hub to me, like I've noticed most of my packages do, this one took a trip to Nashua, NY. After hanging out there for a day or so, it headed to Boston, MA. And, there it sat for five days. It didn't move. I know that USPS is experiencing a crazy amount of volume, so I tried not to stress. After a week of waiting, I eventually submitted a missing mail request, and suddenly, the package was at the hub closest to me and was delivered the next day.

After its adventure, I was worried that the frame was going to be in pieces. I was pleasantly surprised when I opened the securely stapled box and saw that the frame was nestled into a unique cardboard holder. I didn't take any pictures of this before sending it to the recycling pile, but I was super happy not to have to deal with all kinds of packing materials. The best way I can describe it is that the cardboard holder allowed the frame to be suspended in the middle of the box, safe from crushing. Overall, I'm very impressed and will certainly be back again for other projects!

To finish the stitched piece, I cut some Sticky Board down to size and spent more time than seems to look like centering the piece on the Sticky Board. I used straight Sticky Board with no batting since it's going into the frame, and for now, I'm keeping it behind glass. I might decide later I don't want it, but I'm pleased with it for now.

IMG_3690.JPEG

I'm happy that I finished this with a couple of weeks left to January. I wonder if I'll be able to complete the February one before February starts?

Details
Pattern: Country Cottage Needleworks Sampler of the Month - January Sampler
Floss: Classic Colorworks in called for colors
Fabric: 32ct Wichelt Linen in Beautiful Beige
Frame: 4" x 9" off-white on solid wood from ArtToFrame.com
Total Hours Spent on Project: 18 hours, 3 minutes

FFO: Let's Talk Autumn from Hands On Design

Well, I managed to get this finished before autumn bids us adieu! I didn't think I would, and I wasn't even sure if I would make it to display before I started busting out the Christmas decorations, but I did.

I love this series from Hands On Design, even though we just have autumn (and I know winter is coming soon, and it'll be hopping into my cart as soon as it shows up at FQS). Something is satisfying about stitching words, even if they take me just as long as a project that's not mostly text.

I know they say you're not supposed to point out your mistakes, but I'm going to because I hope it will benefit someone someday. I think my fix was acceptable, and in the grand scheme, this is a minuscule error. I stitched this on 32-count chalkboard black linen. It's not the easiest to see, and sometimes I don't pay as close attention as I should. It happens to the best of us. You get distracted by something, and the next thing you know, you're off by a hair. And, I really do mean a hair. I ended up being off horizontally by one hole, not even a whole stitch. And it was towards the top, but after I had enough of the project stitched, taking it out just felt devastating. So, I set it aside for a bit and pondered.

IMG_3125.JPEG

As I looked at the chart, I realized I could add that half stitch space between the horizontal sections, and I could make it work, as long as I remembered to do that. The only place it got a little tricky is at the bottom where the leaves are overlapping, so the word pumpkin has a stitch and a half instead of one stitch between one of the letters. Feel free to zoom in and find it if you must. I think I did a decent job masking it, so certainly someone who doesn't know a thing about cross stitch won't see it. I also had several places where I had to unpick my stitches, which added at least two hours to my time, probably more.

I used the called-for DMC. It was a nice switch from using the fancy floss. I don't really keep any hard and fast rules about how I stitch with my fancy floss. Sometimes I do one half of the stitch across the row and then come back and cross the other way, and sometimes I do each stitch alone. Lately, I've been doing single stitches, which feels like it takes longer, but it's probably just in my head.

IMG_3122.JPEG

I went very simple on finishing this, and I can easily swap out the finishing as the seasons change, and I complete the other versions. I stuck this on an 8" x 10" piece of sticky board and put it in a frame that I purchased from Michael's. I don't have the glass in front, but do have it behind the stitched piece if I decide I want to change that in the future.

Details
Fabric: Wichelt 32ct linen in chalkboard black
Floss: Called-for DMC
Pattern: Hands On Design Let's Talk Autumn (Chalk Talk)
Other: Sticky Board, 8" x 10"
Frame: Gray 5" x 7" Frame with Double Mat, Expressions™ by Studio Décor from Michael's
Total Hours Spent: 60 hours, 28 minutes (I think I'm a slow stitcher)

FFO: Hello Fall

I have finished another cross stitch project! This one is to decorate my house for Fall. Let's ignore that it is now October 7th, and I haven't even put my Fall decorations up yet. I'm usually much faster. The first week of September, but I haven't been ready to let go of summer, and we've had an on-going basement project, which means my decorations are currently a little harder to get to.

Anyway, I'm a big fan of Priscilla and Chelsea of Stitching with the Housewives/The Real Housewives of Cross Stitch. I'm thrilled that they've started releasing their own patterns and love that many of them are on the smaller side because that means I can complete them in a reasonable time. I track my crafting time, mostly because I like to see what I've done with my time. Before I started doing that, I would inevitably hit Sunday night and say, "Did I even DO anything this weekend?" Now, I know whether I did or I didn't!

This finish is part of the What's in My Cup Series from Stitching with the Housewives and is called Hello Fall. It's an adorable fox popping out of a mug with leaves and acorns scattered around. Even though this is a smaller project, it still took me a decent number of hours. I discovered that most of the reason for this is I tend to get distracted while stitching, because of what I'm watching, where I am, who I'm talking to, or my phone has something VERY (not) interesting on it. Anyway, I stitched this little guy (I don't know why I'm assuming he's a guy, but that's how he's spoken to me) in the called for colors of Classic Colorworks on 32ct Wichelt Linen in Chalkboard. The pattern suggests 28ct, but when it comes to linen, I prefer 32ct. If it's an evenweave, I don't mind 28ct, probably because the threads are a little thicker on most evenweaves than this particular linen.  

IMG_2670.JPEG

Because I used 32ct, my stitches are so tiny. When I first started, I took a picture of the little leaves next to my fingers (which just so happened to coordinate well) and texted it to my sister, wondering if I'd made a terrible mistake. I knew how I wanted to finish it, so I did want the finished stitching a little on the smaller side, and the 32ct would get me where I wanted to be.

IMG_2671.JPEG

Stitching on dark colors can be a little tricky. I've found recently that I have a bit more trouble seeing the holes than I have in the past. I don't know if my eyes are tired from staring at a screen all day, or if my eyes are getting older. (They're not that old...they're only going to be 38 on November 12th, but I don't know when eyes start changing. I did read recently that by age 40, your eyes need twice as much light as they did when you were 20. That was kind of...eye-opening...yeah, I went there.) I've found that having adequate light and putting the pattern in my lap under my stitching makes it easier to see the holes on dark fabric.

I stitched away on my project and kept wondering if I wanted it to say, "Hello Fall." Since we're already in October, it felt a little late to be welcoming Fall in, so I decided to make a slight change to "Happy Fall." I thought that this would carry me through to my Christmas decorations a little better than the original. It was a simple change since I only had to change a few letters. I grabbed some graph paper and did a little doodling, and in no time, I had the new letters.

62355254807__E8E28048-8A2C-4B0E-86ED-79B46B19E3C7.JPG

I knew that I wanted this to be an addition to my autumn decorations, but I wasn't sure exactly how to do that. I love watching Priscilla's finishes every weekend, but I'm still a little new at it, so mine isn't perfect, and I have this terrible trait that prevents me from finishing a project. I think it's two things. I want it to be perfect, and I have a terrible time making decisions and don't want to regret my choice.

About a month and a half ago, I placed an order online at Michael's. The store near me is open, but I'm still trying to avoid going out as much as possible, which is tough, but it feels like the right thing to do right now. I'm a sucker for plaid, and when I saw the 6" Oval Plaid Metal Bucket from Ashland, into my cart, it went. It helped that it was on sale! I added some other assorted finishing pieces, frames, florals and picks, and some ribbon, thinking ahead to some other projects that I wanted to finish. They were all on sale, which is my favorite kind of purchase.

I created a floral arrangement to go in the bucket with various florals that I ordered, sticking to an autumn/orange theme. I haven't picked up any fake flowers since probably the mid-90s, so I had to dig around the garage for some wire cutters to cut the pieces apart. I'm also not super confident with my arranging skills at this point, but I think, overall, the arrangement came out pretty cute.

I didn't take any pictures of my finishing process, since I'm still not a pro with the glue gun, but I used black foam board under the finished piece and sticky board under the fabric. The fabric is from Lori Holt's Prim collection. I cut the foam board to 3" x 4" and the sticky board to 4" x 5" and attached the fabrics to each with a combination of finishing tape and hot glue. Since the bucket is metal, I glued a magnet onto the back of the piece and stuck it on the bucket. I did test the magnet first to make sure that it stuck.

IMG_2763.JPEG

Despite parts of it being a little lumpy, I'm pleased with how this looks. I'm looking forward to adding it to my other autumn decorations, and I think I'll be sad to put him away the day after Thanksgiving.

Details 
Pattern: Stitching with the Housewives Hello Fall
Floss: Classic Colorworks in called for colors
Fabric: 32 Count Wichelt Linen in Chalkboard; Lori Holt Prim Daisy Gingham
Total Hours Spent on Project: 12 hours, 29 minutes stitching, about an hour finishing