Journey 2 Nebula - Candy Dish: Cutting & Layout

While I've used stash fabric and scraps for the previous stops on the Journey 2 Nebula, I couldn't resist Purrfect Day by My Mind's Eye for Riley Blake, so I purchased a charm pack and some yardage to complete Candy Dish. I just love cats! I have a cat, a black cat named Minnie, who is now 11 years old. We've been through a lot together. Now that I'm working from home, she snoozes in a bed all day next to me while I work.

The cutting for Candy Dish is pretty straightforward. Hexagons and triangles and the Hex N More ruler makes it super easy to do. I trimmed all of my triangles using the GE Designs Point Trimmers (60-degree) because it was more manageable than wresting with the ruler to cut all of the points.

I'm pretty happy with the layouts that I picked. I did split the hexies wrong the first time because apparently reading comprehension is hard. :) But it's all good!

I'm looking forward to adding these pillows to my collection.

Sewcialites: Block 6

Block 6 of Sewcialites is called Devoted and is brought to us by Robin Pickens. This one is rated experienced, and I would definitely agree with that rating. It took me about an hour and a half to complete. There are a lot of small HSTs in this block. The block is nearly all HSTs! We've discussed my trepidation around HSTs before, but maybe by the end of this project, I'll feel a lot more comfortable with them.

I did use the Triangles on a Roll in the 1" finished size for the smaller HSTs and made the two larger ones the traditional way. I'm still figuring out which way I prefer, but I think I like making larger and trimming down. My finished block is more accurate when I do that versus using the triangle paper and trimming on the lines on that.

It is a stunning block. I'm not 100% happy with the way mine finished as it's a little wobbly, but the block design itself is striking. I might remake this one after I make the next block with the fabric. I want to make sure I have enough, though I'm sure I will since there is a significant portion of the fat quarter remaining.

IMG_2996.jpg

Fast & Furious: Fall Fellows

The second pattern in GE Designs's Fast & Furious season 2 came out last week. I had a plan for which fabric I was going to use for this one. I'm not much of a Halloween person, but being in Massachusetts, we have plenty of Fall to go around. Like the last Fast & Furious project, I wanted to use fabric from my stash, so I went digging.

The fabric I decided on goes back to the December 2017 Sew Sampler Box! That box came with a Star Twist Helping Hands Fat Eighth Bundle by Kim Diehl for Henry Glass Fabrics, and I used all but one of the fat eighths for this project. I needed to select a background color, but I didn't have anything I could use, so I went with Laundry Basket Favorites Linen Texture in Parchment by Laundry Basket Quilts for Andover Fabrics. It's a beautiful fabric, and I'd love to revisit the line for something else. (I do have a Laundry Basket Quilts Rainbow Alaska Kit burning a hole in my pocket right now. It uses Century Solids, and it's been sitting next to me daily since I got it. It's a beautiful quilt, and Edyta has a quilt along for it going on right now, but this will probably be a later in the Fall/early winter project for me.)

Fall Fellows is a pair of pumpkins and is a quilt as you go project. I wasn't sure how this one would work since the last one was all just straight lines on an angle, but I should've known to trust Gudrun. Other than a couple of reading comprehension issues, this pattern, paired with the video, was fun and straightforward. I did use Photoshop to figure out which colors I wanted where. I tried lighter pumpkins, teal pumpkins, and every variation and settled on this.

IMG_2985.jpg

For the backing, I used two of the fat eighths in the more natural colorways, plus the green that I used for the pumpkins' stems. Even though I used light thread, it doesn't look like it doesn't belong on the back with the quilt as you go lines.

IMG_2982.jpg

The prairie points were a little challenging, and they didn't sew down perfectly. I'm sure I could've made it look a little tidier if I had taken a bit more time on it, but I do like the dimension they add. I love the finished look of this piece. I'm not sure where I'll put it. I don't have a place to use a wall hanging, but I have plenty of flat surfaces that could use a little sprucing. I like how the deep colors pop off the parchment background. I did use one of the fat eighths for the binding in the deep teal color, and I feel like it finishes the piece nicely.

IMG_2978.jpg

Details
Fabric: Star Twist Helping Hands by Kim Diehl for Henry Glass Fabrics, Laundry Basket Favorites Linen Texture in Parchment by Laundry Basket Quilts for Andover Fabrics
Thread: Aurafil, 50wt: 2000
Batting: 100% polyester
Pattern: Ge Designs Fall Fellows
Total Hours Spent: 4 hours, 30 minutes

Journey 2 Nebula - Rock Candy: Finished!

I haven't been sure about this particular project in the Journey 2 Nebula. I do love the design of Rock Candy, but I'm not sure about my fabric choice. I am trying to use up some of my stash and not buy fabric that I don't need, but there's so much beautiful fabric out there. The next project will be new fabric because I couldn't resist it. You'll see it later this week!

The piecing went together much quicker than I thought that it was going to. Once I had it all laid out and the sections separated, I completed it in a bit over an hour and a half. I tried to be careful not to stress the bias edges unnecessarily, but there are a couple of places that the points aren't exact (which I really noticed when quilting since I got a good look at every spot).

I finished piecing the top last Tuesday, the day the piecing video came out, but I had no clue what I would do with my backing or quilting. I didn't like not having a plan since I've had a plan for all of the other projects, so I don't think I'll jump in with Gazebo either since I already have Candy Dish planned out. I'll have to take some time in the next couple of weeks to dig through the stash and put together what I need to make it work. For the backing, I ended up settling on a solid I had leftovers of and adding in a label and a coordinating 10" square from the Arctic line that was leftover. Cut it to fit the label, and then pieced it with the solid. It used up all of the solid fabric's leftovers, so at least I'm not wasteful in using what I have.

IMG_2976.jpg

I even pieced together my backing fabric. I've done this before and been pleased with the results, so I did it again here. If you've never done this, it's super easy. You take your two batting pieces and butt them up next to each other, not overlapping, and zigzag stitch them together. You can also use fusible, but I prefer just stitching them together. Doing this also used up all of a leftover batting piece, contributing to not being wasteful and cleaning the sewing space.

I had zero clue what I was going to do with the quilting, so I just sat down on Friday night and went for it. I ended up doing diagonal lines that crossed into a diamond pattern. I've seen some beautiful free motion quilting in the Facebook group, but instead of using these pieces to practice that, I've decided to go with what I feel comfortable with, at least so far. I'm fairly positive the next project will be straight line quilting as well. Overall, I'm happy with the way it looks. I used a light gray solid fat quarter for the binding, and I think it comes together nicely.

IMG_2971.jpg

Details
Fabric: Arctic by Elizabeth Hartman for Robert Kaufman, unknown white, unknown gray, unknown teal (all from stash)
Thread: Aurafil, 50wt: Piecing, 2000; Quilting, 2021; Binding, 2615
Batting: 100% cotton from scraps
Pattern: Jaybird Quilts Rock Candy
Total Hours Spent: 6 hours, 20 minutes

Sewcialites: Block 5

Block 5 of Sewcialites is called Wisdom and was designed by Sherri McConnell. That's two Sherri McConnell patterns for me this week, and I'm pleased with the way both of them worked out. This week's block is labeled as beginner, and that's just what I needed this morning. An easy block that makes me feel accomplished. Even though I have finished things this week, it's been a tough week outside of my crafting, so it's extra nice when crafting works out.

This block, like many of the others, includes half square triangle blocks. Again this week, I skipped the Triangles on a Roll, mostly because I knew it would be faster to do it the way the pattern shows. I cut my squares a little large to trim down the HSTs to the perfect measurement.

For the cutting on these blocks, I haven't really broken too far into the yardage. I'm still using stips I cut for the first couple of blocks. They're just about used up now, though. I have them labeled at the selvage with a Frixion marker, so I don't have to remeasure the strips each time.

It came together in under 45 minutes, including digging out the correct fabric and cutting. The final block was just about 6.5," and nearly all of my seams meet where they're supposed to. There's just something about this block that makes me happy. I might prop it up on my desk for the next week to give myself something to smile at when things get tough.

IMG_2939.jpg

Pack and Go Project Bag - Sew Sampler Box September 2020

I finished the Pack and Go Project Bag designed by Sherri McConnell recently. This is probably the soonest I've ever completed a Sew Sampler Box project, and I learned many things doing this project. The first being that I'm NOT a bag-making person. Second, when I'm doing a project I don't have experience with, I should probably not try to get it done all in one day. Third, I am not good at estimating the size of something even when the dimensions are given because this is much larger than I thought it would be, but that's okay. I can put more stuff in it!

IMG_2935.JPEG

The ByAnnie products were quite impressive. I haven't used them before, but the project called for a zipper, Soft and Stable, and Clear Vinyl, so I purchased those along with the lightweight fusible the pattern called for. If I ever make a bag again, which I don't know if I will, but I do have Soft and Stable, and Clear Vinyl left over, but if I ever make one again, I will reach for the ByAnnie products.

The instructions included in the Sew Sampler Box were very clear and had illustrations where needed. It uses Balboa by Sherri & Chelsi for Moda fat quarters. Some of the fat quarters still have plenty of fabric leftover, so I think those leftovers will be good for masks or something else. I like the fabric and have been drawn to the collection since it was previewed, so I'm glad I could use it for this project. I can fit SO MUCH in this bag! Far more than I have here in this carefully placed photo.

IMG_2937.JPEG

Details
Fabric: Balboa by Sherri & Chelsi for Moda
Pattern: Pack and Go Project Bag by Sherri McConnell, Sew Sampler Box Exclusive
Thread: Aurafil 50wt, 2000
Other Notions: ByAnnie Soft and Stable, Clear Vinyl, 24" Zipper, lightweight fusible
Total Hours: 5 hours, 39 minutes

FFO: Catoween Wanda + Catoween Cal

Recently, I was lucky enough to be the winner of a free copy of Stitching with the Housewives Catoween Wanda while watching Priscilla & Chelsea’s YouTube channel. I don't often win, so I was super excited! I'm not much of a Halloween person. There's less than a handful of Halloween movies I like, but I LOVE cats, so even before I tried to win this one, I knew I was going to purchase it. When Catoween Cal came out, I knew that I wanted to stitch both to add just a hint of Halloween to my decor.

I was going to stitch them on 32 count Wichelt Linen in Chalkboard, but I managed to catch when Fat Quarter Shop uploaded their Picture This Plus 28 count Lugana, so I grabbed a piece in Shadow, not knowing what I was going to do with it. After I hit purchase, I thought, "Oh, this would be great for my Catoween project!" So, as soon as it came in the mail, I trimmed two pieces and started stitching.

IMG_2885.jpg

I used the called for Classic Colorworks but subbed DMC 3865 for the 12-Grain since that color wasn't available when I was ordering, and I have plenty of 3865. When I finished stitching, I realized that I didn't feel the fabric was quite dark enough to stand in for the design's black areas, so I dug some DMC 310 out of my stash and stitched those no-stitch areas. (I have an abundance of 310, so next time I think I need it, I do not!)

I enjoyed stitching both of these pieces. I prefer evenweave over linen, but it's a little harder to come by in the colors I want to stitch on, so when I can get it, I do. Otherwise, I make do with linen. They were reasonably quick stitches considering I feel that I am a slow stitcher.

To finish, I used sticky board that I trimmed down to fit the stitched piece, added a piece of 100% cotton, and layered the piece over the top. I did use It's Sew Emma Finishing Tape to secure it, mostly because I did not feel like dealing with the glue gun. I had a half yard of Midnight Magic plaid that I used for the background fabric. I knew I wanted to use the candy corn pick I had ordered a while ago, but I wasn't quite sure how. After messing about with the layout, I decided that I preferred the bow/candy corn combination at the bottom. I used a scrap of fabric from my stash that I tore into strips for the bow. I'm not a great bow-maker, but I don't hate the way this one came out.

IMG_2911.jpg

Looking at these two kitties makes me smile every time I walk by!

Details 

Pattern: Stitching with the Housewives Catoween Wanda, Stitching with the Housewives Catoween Cal
Floss: Classic Colorworks in called for colors but swapped 12-Grain for DMC 3865 and added DMC 310 for the pupils and pumpkin black areas
Fabric: 28ct Picture This Plus Lugana in Shadow; Finishing Fabric - Midnight Magic by April Rosenthal for Moda, random stash fabric for ribbon
Additional Finishing Items: Display Stand Set from Amazon, Candy Corn Pick from Michaels
Total Hours Spent on Project: Wanda - 8 hours, 47 minutes; Cal - 8 hours, 34 minutes, plus about an hour finishing both

Sewcialites: Block 4

Spirited, the Vanessa Goertzen designed block 4 of the Sewcialites Quilt Along released on Friday. It was a fun block that took about an hour to complete, including cutting.

I enjoyed this block and created my HSTs the traditional way instead of using the Triangles on a Roll. I did cut my squares slightly larger as insurance to trim my finished HST blocks down to the exact size needed.

I love the finished look of this block. The fabric I chose does take a little away from the exciting shape that forms from the contrast between solid and print, but it also does a fantastic job of hiding my slightly off areas.

Spirited was a pretty straightforward block, and I didn't run into any issues when assembling. It even came out just about exactly 6.5" with just a little wobble to trim off the edge from my corner squares.

IMG_2879.jpeg

Journey 2 Nebula - Rock Candy: Cutting & Layout

We've now reached the point in the Journey 2 Nebula, where I got stuck deciding which stash fabric I was going to use, so I stopped with the planning. So, before I started cutting for Rock Candy, I had to do some digging around in the fabric drawers. I'm still not sure about my choice, but I've cut everything, so I'm going to go with it.

I've been a subscriber to the Fat Quarter Shop's Sew Sampler Box from the beginning, and the August 2018 box included the Petite Arctic 10″ Squares by Elizabeth Hartman for Robert Kaufman Fabrics. The included pattern was nifty, but I wasn't interested in sewing it, so into the stash, everything went. I did make one mask with one of the 10" squares and meant to make more, but didn't get around to it. While digging, I came across the squares and decided to give it a try. Since the pattern calls for 5" squares, one 10" square made four charm squares. I didn't want to use all of the prints, so I selected six squares, grabbed some solid from my stash, and got to cutting my diamonds and triangles.

I tried several layouts grouping the colors, pairing the colors, and finally doing a more scrappy look. None of them were giving me the feeling I was looking for. I have plenty of autumn and Christmas decorations, but I have nothing for after Christmas, so my house is very sad when I take everything down, so I decided to go for a wintry look, but this wasn't doing it for me. I walked away for a bit and eventually wandered back and stared at it.

I liked the way the scrappy layout looked, but something wasn't right. I said to myself, "well, let's see what happens when I take the mauve out." I think that's exactly what it seemed to need! It's wintry, and it will coordinate well with the colors that are already in my kitchen. I'm excited to sew this one next week!

IMG_2864.jpg

Maple Leaf Mini Quilt

Recently, on the Fat Quarter Shop Livestream, Kimberly showed a free pattern available on their site. The Maple Leaf Mini Quilt uses the Orange You Glad Fat Quarter Bundle Curated by Fat Quarter Shop Featuring Fig Tree Quilts. It has four oranges from All Hallows Eve and one green from Christmas Figs II. I received the bundle in June 2020 Sew Sampler Box, and while the pattern that came with the box was cute, it wasn't something I was interested in, so I added the fabric to my stash.

When Kimberly showed the mini quilt, I knew that I had to dig the fabric out of my stash! The pattern includes directions for a pieced backing, so all I needed was background fabric, and I pulled out random solid white to use with it. I'm not sure which color number it is, but it's probably a Moda Bella Solid. I trimmed what I needed from a larger piece and starched my fat quarters and the background. The weather was beautiful the day that I did it, so they dried outside in no time. Later that evening, I cut all of the pieces I needed. I didn't trim the backing squares precisely as written at this point because I wasn't sure what I was going to do with my label yet, and I wanted to make sure I had extra if needed. I labeled all of the pieces with my Alphabities.

IMG_2734.jpg

I chain pieced where I could on the pattern, and it went together quite smoothly. Most of the projects I've been working on lately have directed to press seams open, so it was a little strange pressing to one side, but it was nice to be able to nest the seams. For the backing, I printed a label and pieced some fabric leftovers on either side. And, check this out! I unintentionally matched my seams! I couldn't have done this well if I tried!

I wasn't sure how I wanted to quilt this, and I'll admit that I started, ripped, and pulled out more than once. I decided to go with a larger meander. I tried stitching in the ditch, but that didn't turn out the way I wanted to. Since I'm still not super at free motion quilting but knew I could meander, I gave it a try, and I was quite pleased with the results. Machine binding would've been faster, but I went for hand binding, and it went pretty quick.

IMG_2835.jpg

I appreciate that Fat Quarter Shop offers free patterns and that I was able to us stash that I already had for a new decoration for my house. Now, I have a cute Fall table topper to go with my cute fall cross stitch. :)

IMG_2838.jpg

Details
Fabric: Orange You Glad Fat Quarter Bundle
Thread: Aurafil 50wt, 2000
Batting: 100% Polyester
Pattern: Maple Leaf Mini Quilt from Fat Quarter Shop
Total Hours: 7 hours, 4 minutes

Sewcialites: Block 3

Oh boy! A whole block of HSTs. Just looking at the pattern this week has made me break out into a bit of a sweat. It turns out the sweat was probably a bit warranted.

Block 3 was designed by Brigitte Heitland of Zen Chic and is called Affection. I know the joke has been made in the Sewcialites group on Facebook already, but I'm going to go ahead and make it myself. I do NOT have much affection for this block. I appreciate what I learned from it, and I'll happily carry those skills with me as I continue quilting, but I certainly do not feel any kindness, goodwill, devotion, or friendship with this block. (Yes, I looked up synonyms for affection. The thesaurus has long been my friend both at work and in the outside world.)

The block is rated as experienced, and yes, yes, that is an accurate rating. It is not for the faint of heart. How tough can it be, it's a bunch of HSTs, and if you have triangle paper, they're practically already made? Well, kind reader, let me tell you, there are all kinds of ways this block can go awry. I did fine making the individual HSTs, but once I started piecing the block together, that's where things got a little dicey.

IMG_2812.jpg

Matching the corners correctly when attaching the strips of HSTs to the larger HST caused me a bit of a fit, particularly one corner (I’m sure you can see it…it’s right there). I used my seam ripper three times, and it's still not perfect, but if I fiddled with it any further, it wasn't going to end well. There were several places I had to ease the strip in, and even then, there are places where it's not as good as I'd like it to be. It is likely my perfectionism speaking since it's pretty darn close to 6.5" and looks like the picture, especially from a distance. Overall, I'm okay with the block and look forward to the challenge of next week's.

Journey 2 Nebula - Jawbreaker: Finished!

I finished the latest project in the Journey 2 Nebula this week. Jaybird Quilts Jawbreaker is a pillow that uses the Hex n More Ruler to create triangles that turn into hexagons. Last week I had a little trouble with my rotary cutter, but I'm all healed now. You can barely even tell where I had the accident!

I watched Julie's video that had tips for assembling the hexagons and set to work. I don't have an ideal place in my sewing area to layout projects, so I usually do it on the spare bed. Then I have to walk between the two rooms, which isn't a huge deal, it's extra steps, but I like to figure ways to still be accurate without making too many trips. I did figure out a way to chain piece these rows and make it easier. First, I took a picture with my phone of the layout, so I had a reference to double-check the layout. Then, I stacked the triangles from one for and lined them up in order next to my sewing machine. Chain pieced them in pairs and brought them over to the ironing board to press, still attached. When pressing open, I picked up a tip from Kimberly Jolly of Fat Quarter Shop. I set my seams and then press them to one side, then flip them over and press open. I have tried both this and just pressing open in the same sewing session, and I find this way much easier. After pressing open, I bring them back to space next to my machine, still attached, and lay that down. Next, I clip the threads and rotate the pieces to the appropriate layout. After double-checking my layout, I sewed the first two and the last two together, cut the threads, checked the layout, and sewed those two pieces together. I stitched together the rest of the rows and just kept them stacked next to me, so I had them for reference from the next row.

I was a little anxious about trimming the pillow's center since I didn't have a ruler big enough to use for the total square. I followed Julie's direction in the video, and I successfully trimmed the oddly-shaped piece into a square! I was pretty darn proud of myself the other day when I did that successfully.

IMG_2756.jpg

I used another strip from the jelly roll I used for the strip sets for my inner border. I added the two borders and let the top sit for a day to decide how to quilt it. I've seen some lovely quilted Jawbreakers on Instagram and Facebook, and even the simple quilting on the cover of the pattern is appealing. I love the hexagons and didn't want to take away from them at all, so I went with very simple stitching in the ditch. I've never been overly successful with this, but since I haven't tried it in a while, I went for it, and I'm pretty happy that my seams must have been straight because I didn't have trouble stitching in the ditch.

IMG_2782.JPEG

Assembling the pillow should have gone a little more smoothly than it did for me, and if I had paid more attention to what I was doing, it probably would have. After basting the front and back together, I realized that I did the opening vertical to what I was considering the top and bottom instead of horizontal. I momentarily debated ripping it out and starting over. In the end, I decided since this wasn't a learning-how-to-pillow journey, and since it's a pillow that will only be out for about a month and a half, and you can't tell it's wrong, I left it. I did insert a label the same way I did with the last pillow. I printed it on paper with my inkjet printer and then sewed it into the backing.

IMG_2795.JPEG

I love the finished pillow! I didn't purchase another pillow form, so this is just the same form from Amazon that I used on Lucky Charm. Before Christmas, I'll probably pick up another one so that I can use the pillow to decorate. I used the same fabric (and leftovers from the jelly roll) for the Jelly Snowflake. I still haven't quilted that project, but it's on the list before Thanksgiving! Whenever I look at how the hexagons came together so nicely, I am so pleased! I also really like how the black fabric pops. The tiny scattered trees is my favorite print in the collection, which is why I used it for the outer border, binding, and backing.

IMG_2800.jpg

Details
Fabric: The Christmas Card by Sweetwater for Moda
Thread: Aurafill 50wt, 2000
Pattern: Jaybird Quilts Jawbreaker
Batting: 100% polyester
Total Hours Spent: 7 hours, 39 minutes

FFO: Hello Fall

I have finished another cross stitch project! This one is to decorate my house for Fall. Let's ignore that it is now October 7th, and I haven't even put my Fall decorations up yet. I'm usually much faster. The first week of September, but I haven't been ready to let go of summer, and we've had an on-going basement project, which means my decorations are currently a little harder to get to.

Anyway, I'm a big fan of Priscilla and Chelsea of Stitching with the Housewives/The Real Housewives of Cross Stitch. I'm thrilled that they've started releasing their own patterns and love that many of them are on the smaller side because that means I can complete them in a reasonable time. I track my crafting time, mostly because I like to see what I've done with my time. Before I started doing that, I would inevitably hit Sunday night and say, "Did I even DO anything this weekend?" Now, I know whether I did or I didn't!

This finish is part of the What's in My Cup Series from Stitching with the Housewives and is called Hello Fall. It's an adorable fox popping out of a mug with leaves and acorns scattered around. Even though this is a smaller project, it still took me a decent number of hours. I discovered that most of the reason for this is I tend to get distracted while stitching, because of what I'm watching, where I am, who I'm talking to, or my phone has something VERY (not) interesting on it. Anyway, I stitched this little guy (I don't know why I'm assuming he's a guy, but that's how he's spoken to me) in the called for colors of Classic Colorworks on 32ct Wichelt Linen in Chalkboard. The pattern suggests 28ct, but when it comes to linen, I prefer 32ct. If it's an evenweave, I don't mind 28ct, probably because the threads are a little thicker on most evenweaves than this particular linen.  

IMG_2670.JPEG

Because I used 32ct, my stitches are so tiny. When I first started, I took a picture of the little leaves next to my fingers (which just so happened to coordinate well) and texted it to my sister, wondering if I'd made a terrible mistake. I knew how I wanted to finish it, so I did want the finished stitching a little on the smaller side, and the 32ct would get me where I wanted to be.

IMG_2671.JPEG

Stitching on dark colors can be a little tricky. I've found recently that I have a bit more trouble seeing the holes than I have in the past. I don't know if my eyes are tired from staring at a screen all day, or if my eyes are getting older. (They're not that old...they're only going to be 38 on November 12th, but I don't know when eyes start changing. I did read recently that by age 40, your eyes need twice as much light as they did when you were 20. That was kind of...eye-opening...yeah, I went there.) I've found that having adequate light and putting the pattern in my lap under my stitching makes it easier to see the holes on dark fabric.

I stitched away on my project and kept wondering if I wanted it to say, "Hello Fall." Since we're already in October, it felt a little late to be welcoming Fall in, so I decided to make a slight change to "Happy Fall." I thought that this would carry me through to my Christmas decorations a little better than the original. It was a simple change since I only had to change a few letters. I grabbed some graph paper and did a little doodling, and in no time, I had the new letters.

62355254807__E8E28048-8A2C-4B0E-86ED-79B46B19E3C7.JPG

I knew that I wanted this to be an addition to my autumn decorations, but I wasn't sure exactly how to do that. I love watching Priscilla's finishes every weekend, but I'm still a little new at it, so mine isn't perfect, and I have this terrible trait that prevents me from finishing a project. I think it's two things. I want it to be perfect, and I have a terrible time making decisions and don't want to regret my choice.

About a month and a half ago, I placed an order online at Michael's. The store near me is open, but I'm still trying to avoid going out as much as possible, which is tough, but it feels like the right thing to do right now. I'm a sucker for plaid, and when I saw the 6" Oval Plaid Metal Bucket from Ashland, into my cart, it went. It helped that it was on sale! I added some other assorted finishing pieces, frames, florals and picks, and some ribbon, thinking ahead to some other projects that I wanted to finish. They were all on sale, which is my favorite kind of purchase.

I created a floral arrangement to go in the bucket with various florals that I ordered, sticking to an autumn/orange theme. I haven't picked up any fake flowers since probably the mid-90s, so I had to dig around the garage for some wire cutters to cut the pieces apart. I'm also not super confident with my arranging skills at this point, but I think, overall, the arrangement came out pretty cute.

I didn't take any pictures of my finishing process, since I'm still not a pro with the glue gun, but I used black foam board under the finished piece and sticky board under the fabric. The fabric is from Lori Holt's Prim collection. I cut the foam board to 3" x 4" and the sticky board to 4" x 5" and attached the fabrics to each with a combination of finishing tape and hot glue. Since the bucket is metal, I glued a magnet onto the back of the piece and stuck it on the bucket. I did test the magnet first to make sure that it stuck.

IMG_2763.JPEG

Despite parts of it being a little lumpy, I'm pleased with how this looks. I'm looking forward to adding it to my other autumn decorations, and I think I'll be sad to put him away the day after Thanksgiving.

Details 
Pattern: Stitching with the Housewives Hello Fall
Floss: Classic Colorworks in called for colors
Fabric: 32 Count Wichelt Linen in Chalkboard; Lori Holt Prim Daisy Gingham
Total Hours Spent on Project: 12 hours, 29 minutes stitching, about an hour finishing

Fast & Furious: Off Kilter

I discovered GE Designs through Fat Quarter Shop shortly before the pandemic began. I started following Gudrun's Facebook group, and when she announced a day-long quilt along in March, I signed on. Since then, I've become a huge fan and have participated in the other quilt alongs Gudrun has hosted. When she announced season 2 of the Fast & Furious Club, I decided to sign up.

I don't have a ton of experience with quilt as you go, but I liked the idea of not having the stress of quilting later. The first project is a table runner called Off Kilter. It calls for fat eights and fat quarters. Still working towards my goal to use up some of my stash, I decided to do some searching through what I already have. As I've mentioned, some of the projects that I've "kitted" up for myself no longer have the same appeal, so shopping through the stash currently works.

In my search, I discovered the 2019 Jolly Box from Fat Quarter Shop. I love the fabric, We Whisk You a Merry Christmas by Kimberbell from Maywood Studios. At the time, I also thought the stockings included in the kit were adorable, but since I haven't made them and we don't have a used for the stockings, I decided to repurpose the fat quarter bundle included in the kit for this project.

Since the project calls for a combination of nine fat quarters and fat eights, and I only had six fat quarters, I had to do some figuring to decide which fabrics I could use where. I ended up only using five of them since one of them didn't seem to blend as well as I hoped. For the most part, I could do the math in my head, but there were a couple of options that I had to draw out to make sure I could cut everything I needed from the fat quarters. As with Sewcialites, I used Photoshop to figure out fabric placement.

IMG_2731.jpg

Once I had that figured out, I ironed my fat quarters and set out to cutting. I didn't bother starching for this project since I wouldn't be doing an excessive amount of cutting, and I wanted to get going on the project. I did use my Alphabities for this one, though; there are a lot of different strips! I fussy-cut the middle square to show off the "We Whisk You a Merry Christmas" saying.

IMG_2728.jpg

The pattern includes video instruction as well as the actual pattern. Since I haven't done much quilt as you go before, this was very helpful. It's also sometimes easier if you see something demonstrated than just reading the pattern. I did have an issue with my fusible batting, in that it wasn't fusible, but I made what I had work with Odif 505 Spray.

For the backing and binding, I was able to scrounge up some plaid from the fabric collection that was remaining online. I do love a plaid. I didn't do the best job of piecing the back/matching plaids when I put my label in, but it's the back, so I'm okay with it. (I’ll show you my backing, but no judgement…well, you can judge, just so it silently, please. From a distance, I suppose it’s not that bad.)

I would have been able to finish the project easily in a day if I didn't hand bind the table runner, but I just am not good at machine binding, and I know if I don't practice, I won't get better, but I didn't want to practice on this!

IMG_2724.jpg

I love the finished table runner! It shows off the fabric well, is a great size, and was super quick. I can see making more, and I think they would be an excellent project for a last-minute gift.

Details
Fabric: We Whisk You a Merry Christmas by Kimberbell Designs for Maywood Studio
Thread: Aurafil 50wt 2692
Batting: Bosal 100% Polyester
Pattern: GE Designs Off Kilter (Fast & Furious Season 2)
Total Hours: 8 hours, 4 minutes

Sewcialites: Block 2

This week's Sewcialites block, designed by Lisa Bongean, is called Loyal. This block is labeled beginner, and it was a lovely, quick sew after work today. It only took me 40 minutes from grabbing the fabric to trimming the block. Because it was so speedy, I didn't take many pictures or use the Alphabities.

There is less contrast between the solid and print fabrics this week, but I'm happy with how it looks. Overall, the quilt will have heavily contrasting and lower contrast blocks, so I think it will balance out. I did use a design board for this. It's nice that the fabric sticks to it, so things don't go wonky if there's a breeze. (Yes, this has happened to me more than once, including recently with the Jawbreaker layout.)

IMG_2707.jpg

Loyal is another block that uses HSTs, so I grabbed my Triangles on a Roll. I utilized the 3.5" strip of solid that I cut for last week's block, so I didn't have to wrangle with a larger piece. I also had a smaller scrap that I trimmed to the required 1.5" square. For the print pieces, I cut a 3.5" strip from the fat quarter and used that for the piece I needed for the HSTs and the rectangles.

Before assembling, I double-checked the finished size on my HSTs. Since last week's block came out a hair large, I don't think I'm hitting precisely the right spot on the line when trimming my paper. The HSTs were a tiny bit larger than the 3" size the pattern called for, so I trimmed it off.

IMG_2708.jpg

Sewing this block together was a breeze since there weren't many seams to match. Trimming it was also relatively easy, and the block ended up closer to 6.5" than last week's.

It was nice to have a quick block after the more complex first block, almost like a palette cleanser. It also leaves me extra time to work on the other projects on my list...and there are many. I'm hoping that I'll have a few things to share after this weekend (or over the weekend).

IMG_2712.jpg

Journey 2 Nebula - Jawbreaker: Cutting & Layout

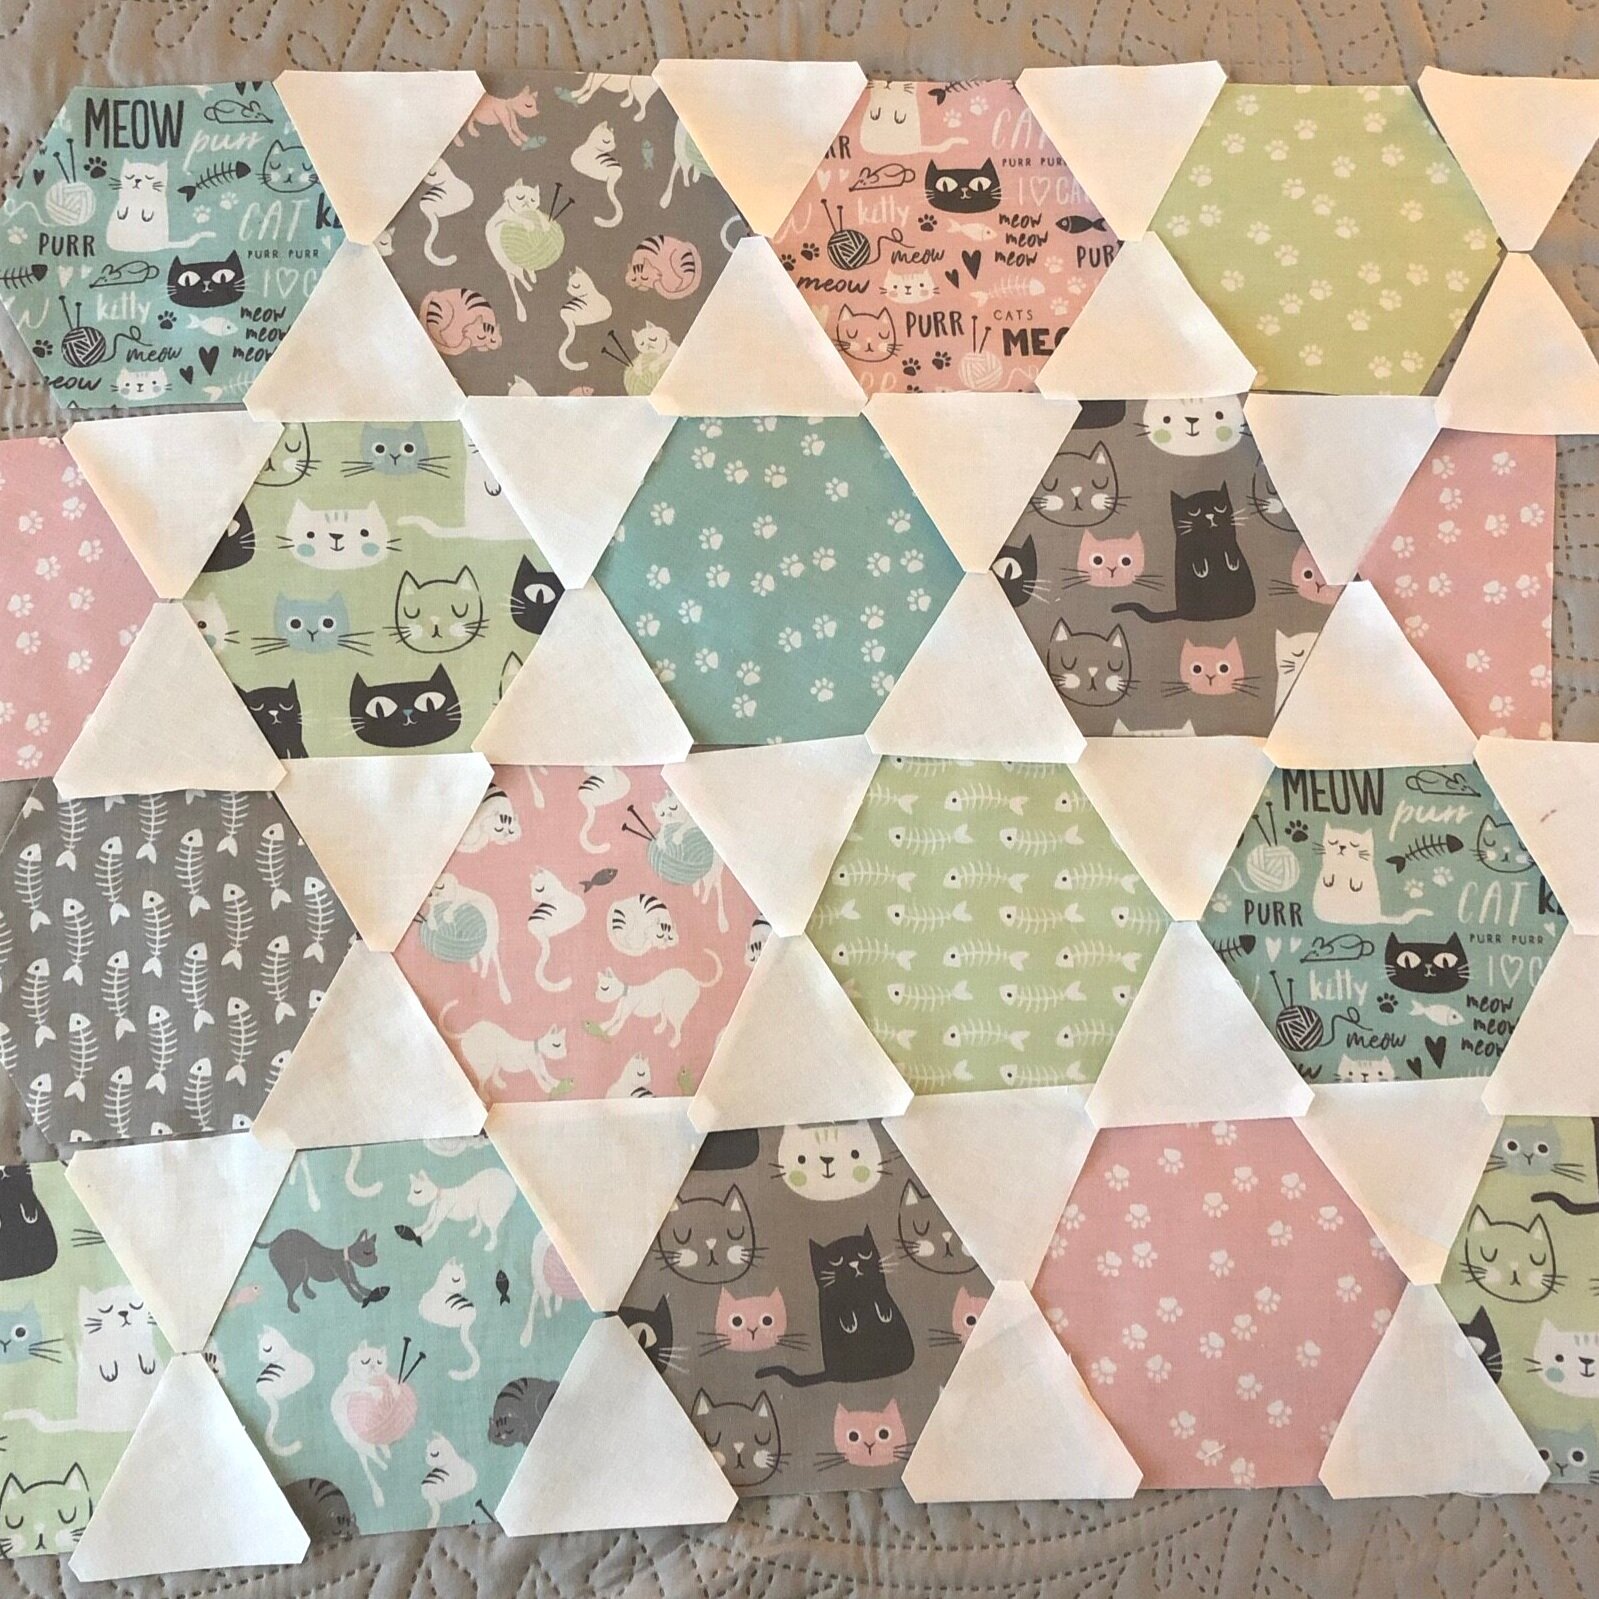
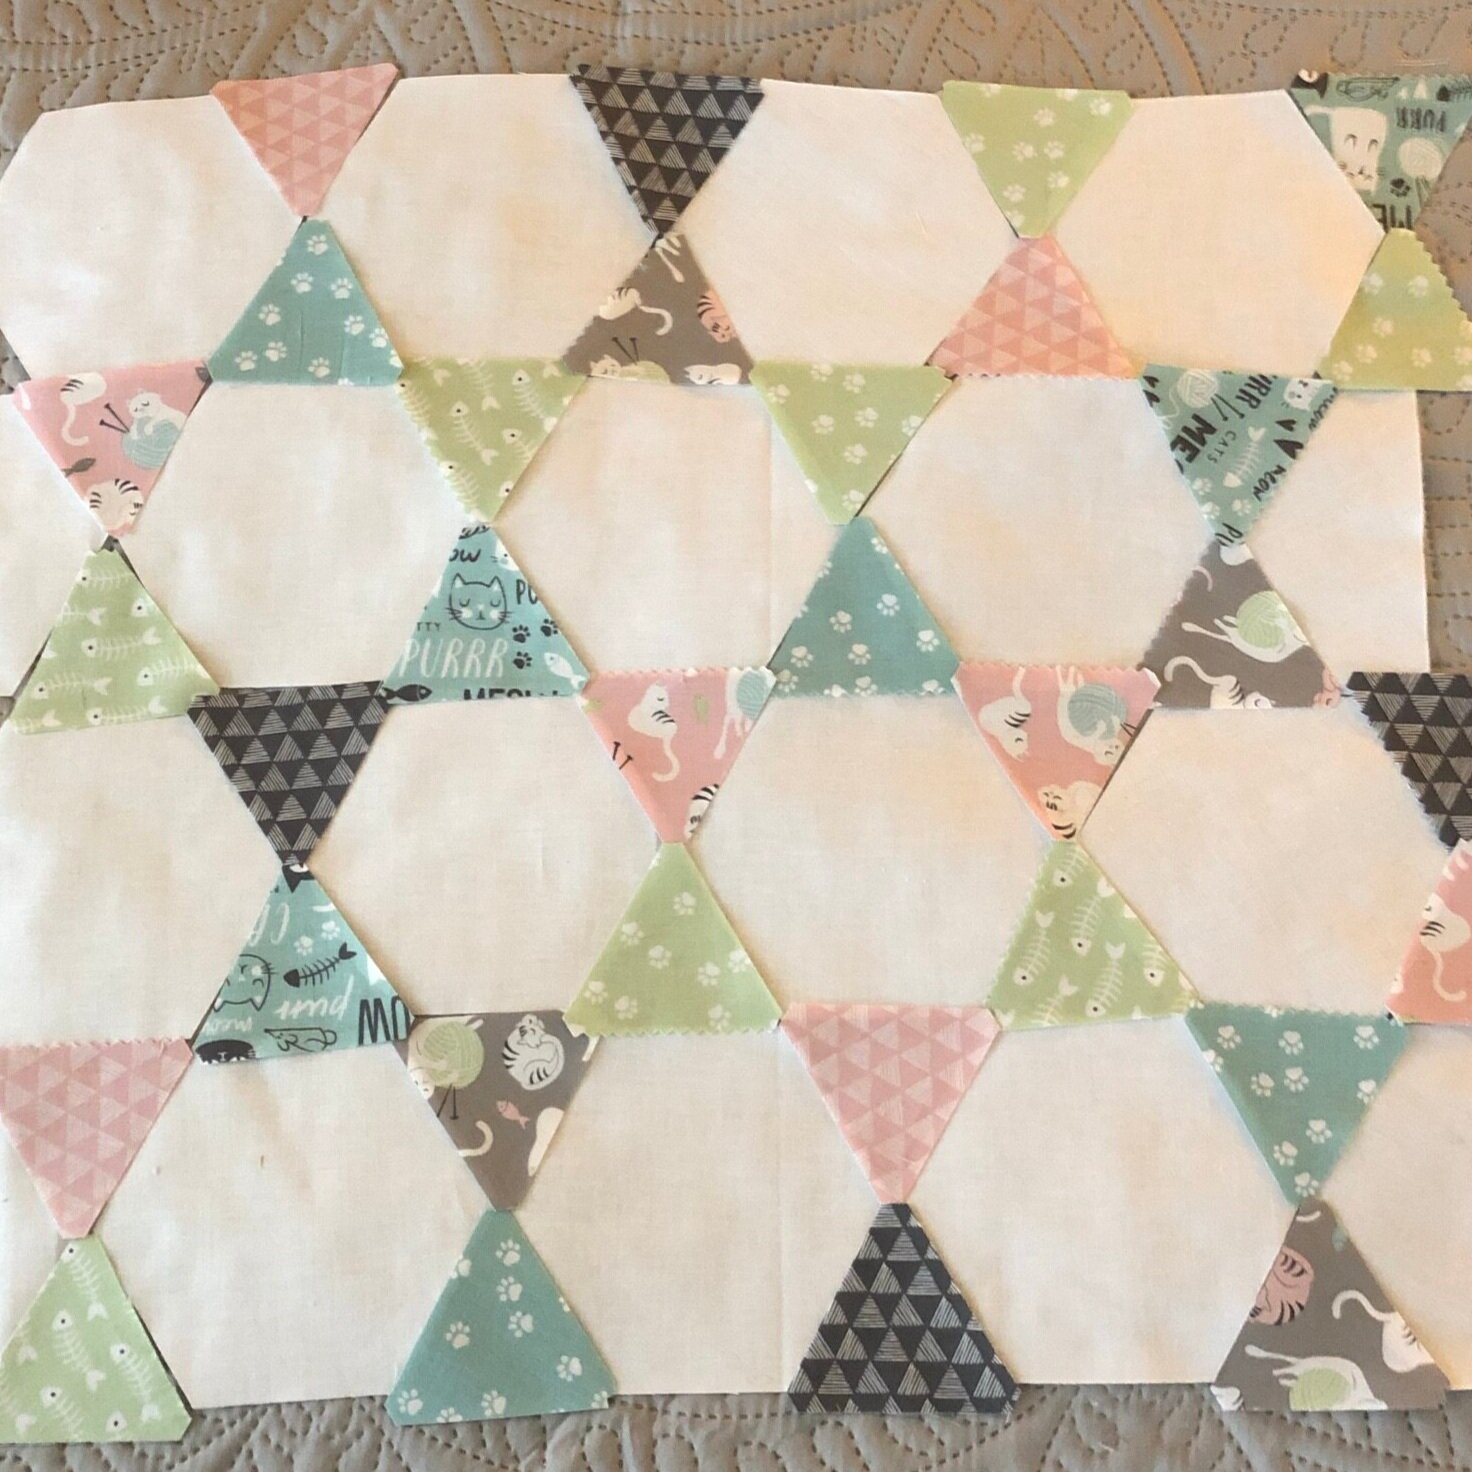
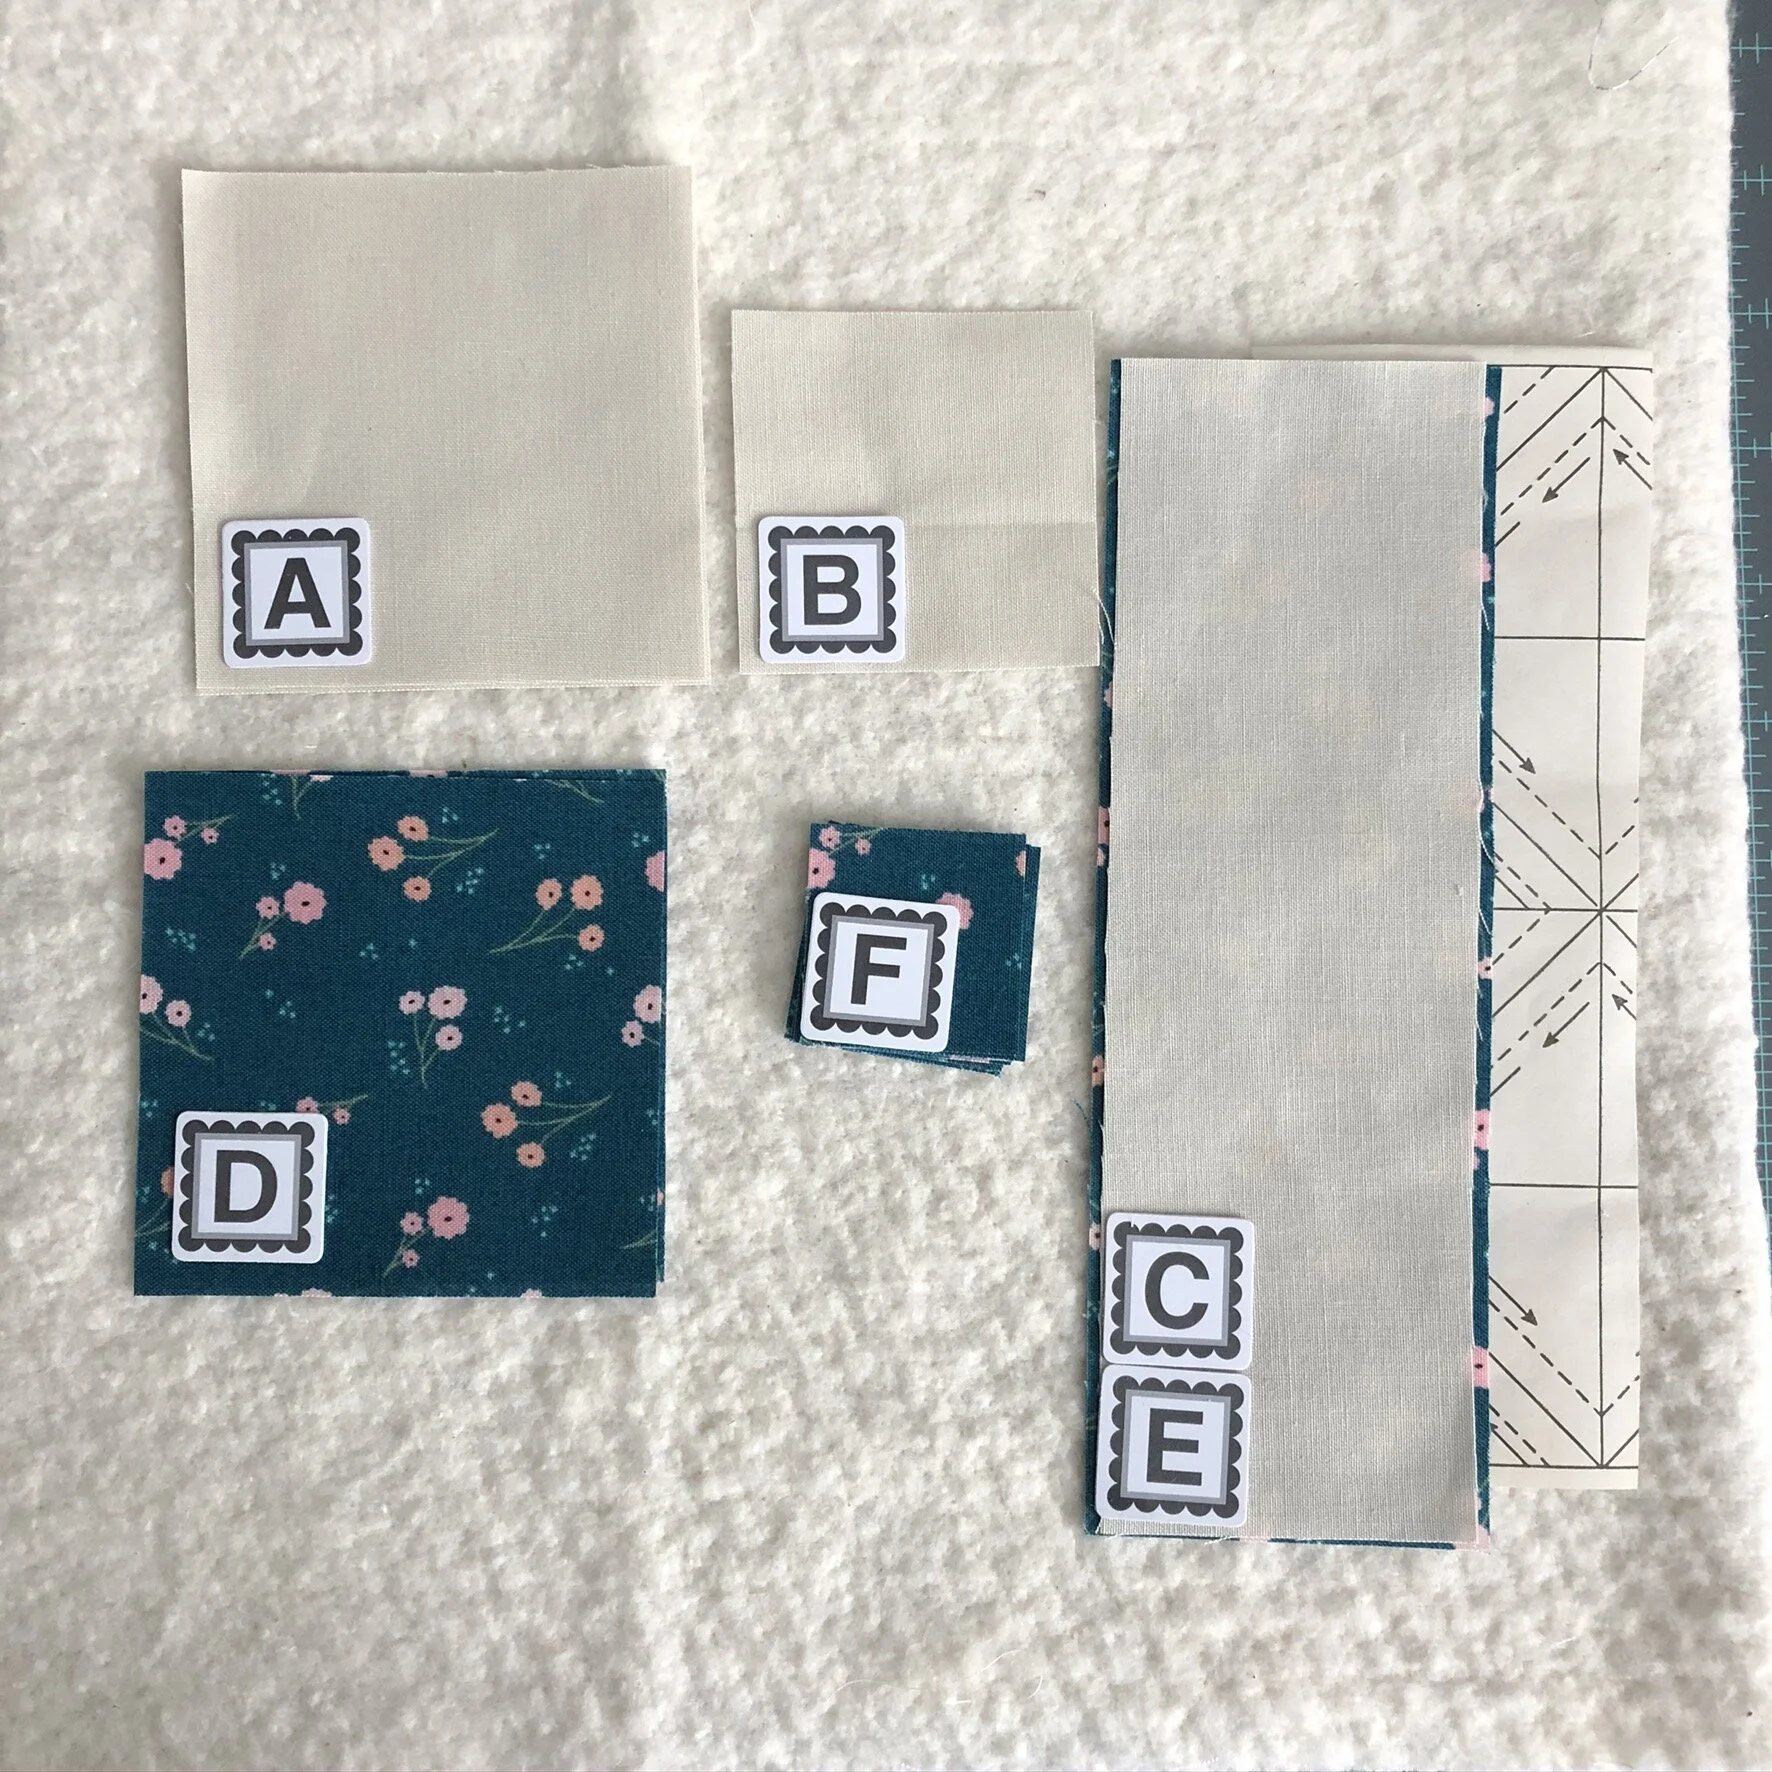
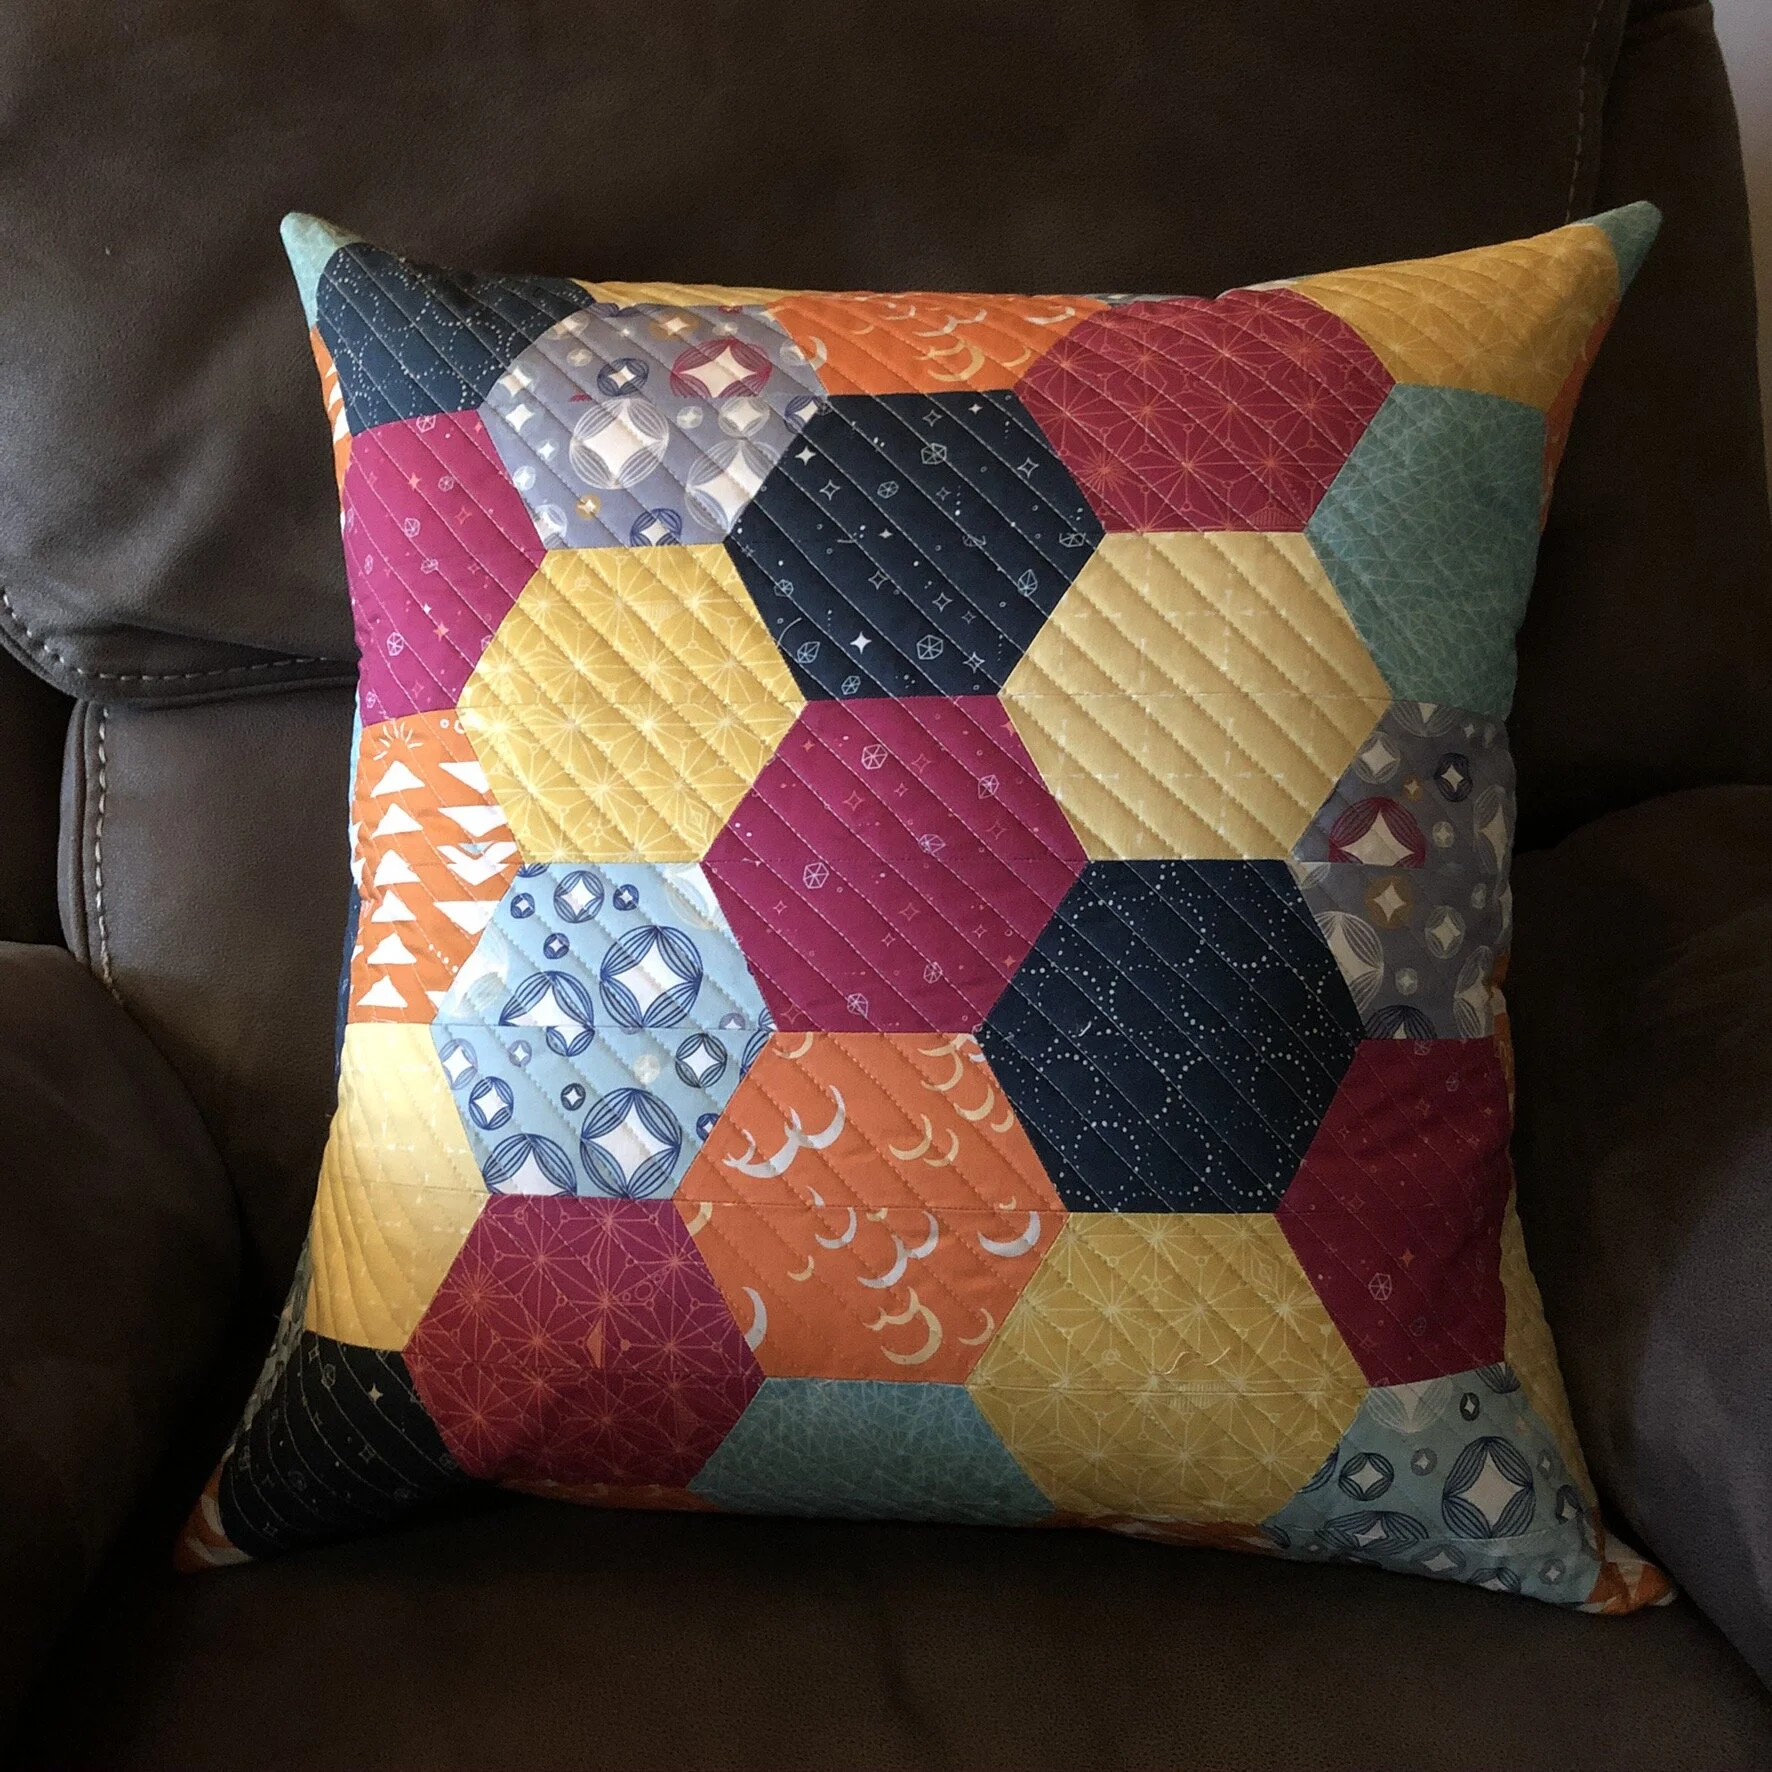
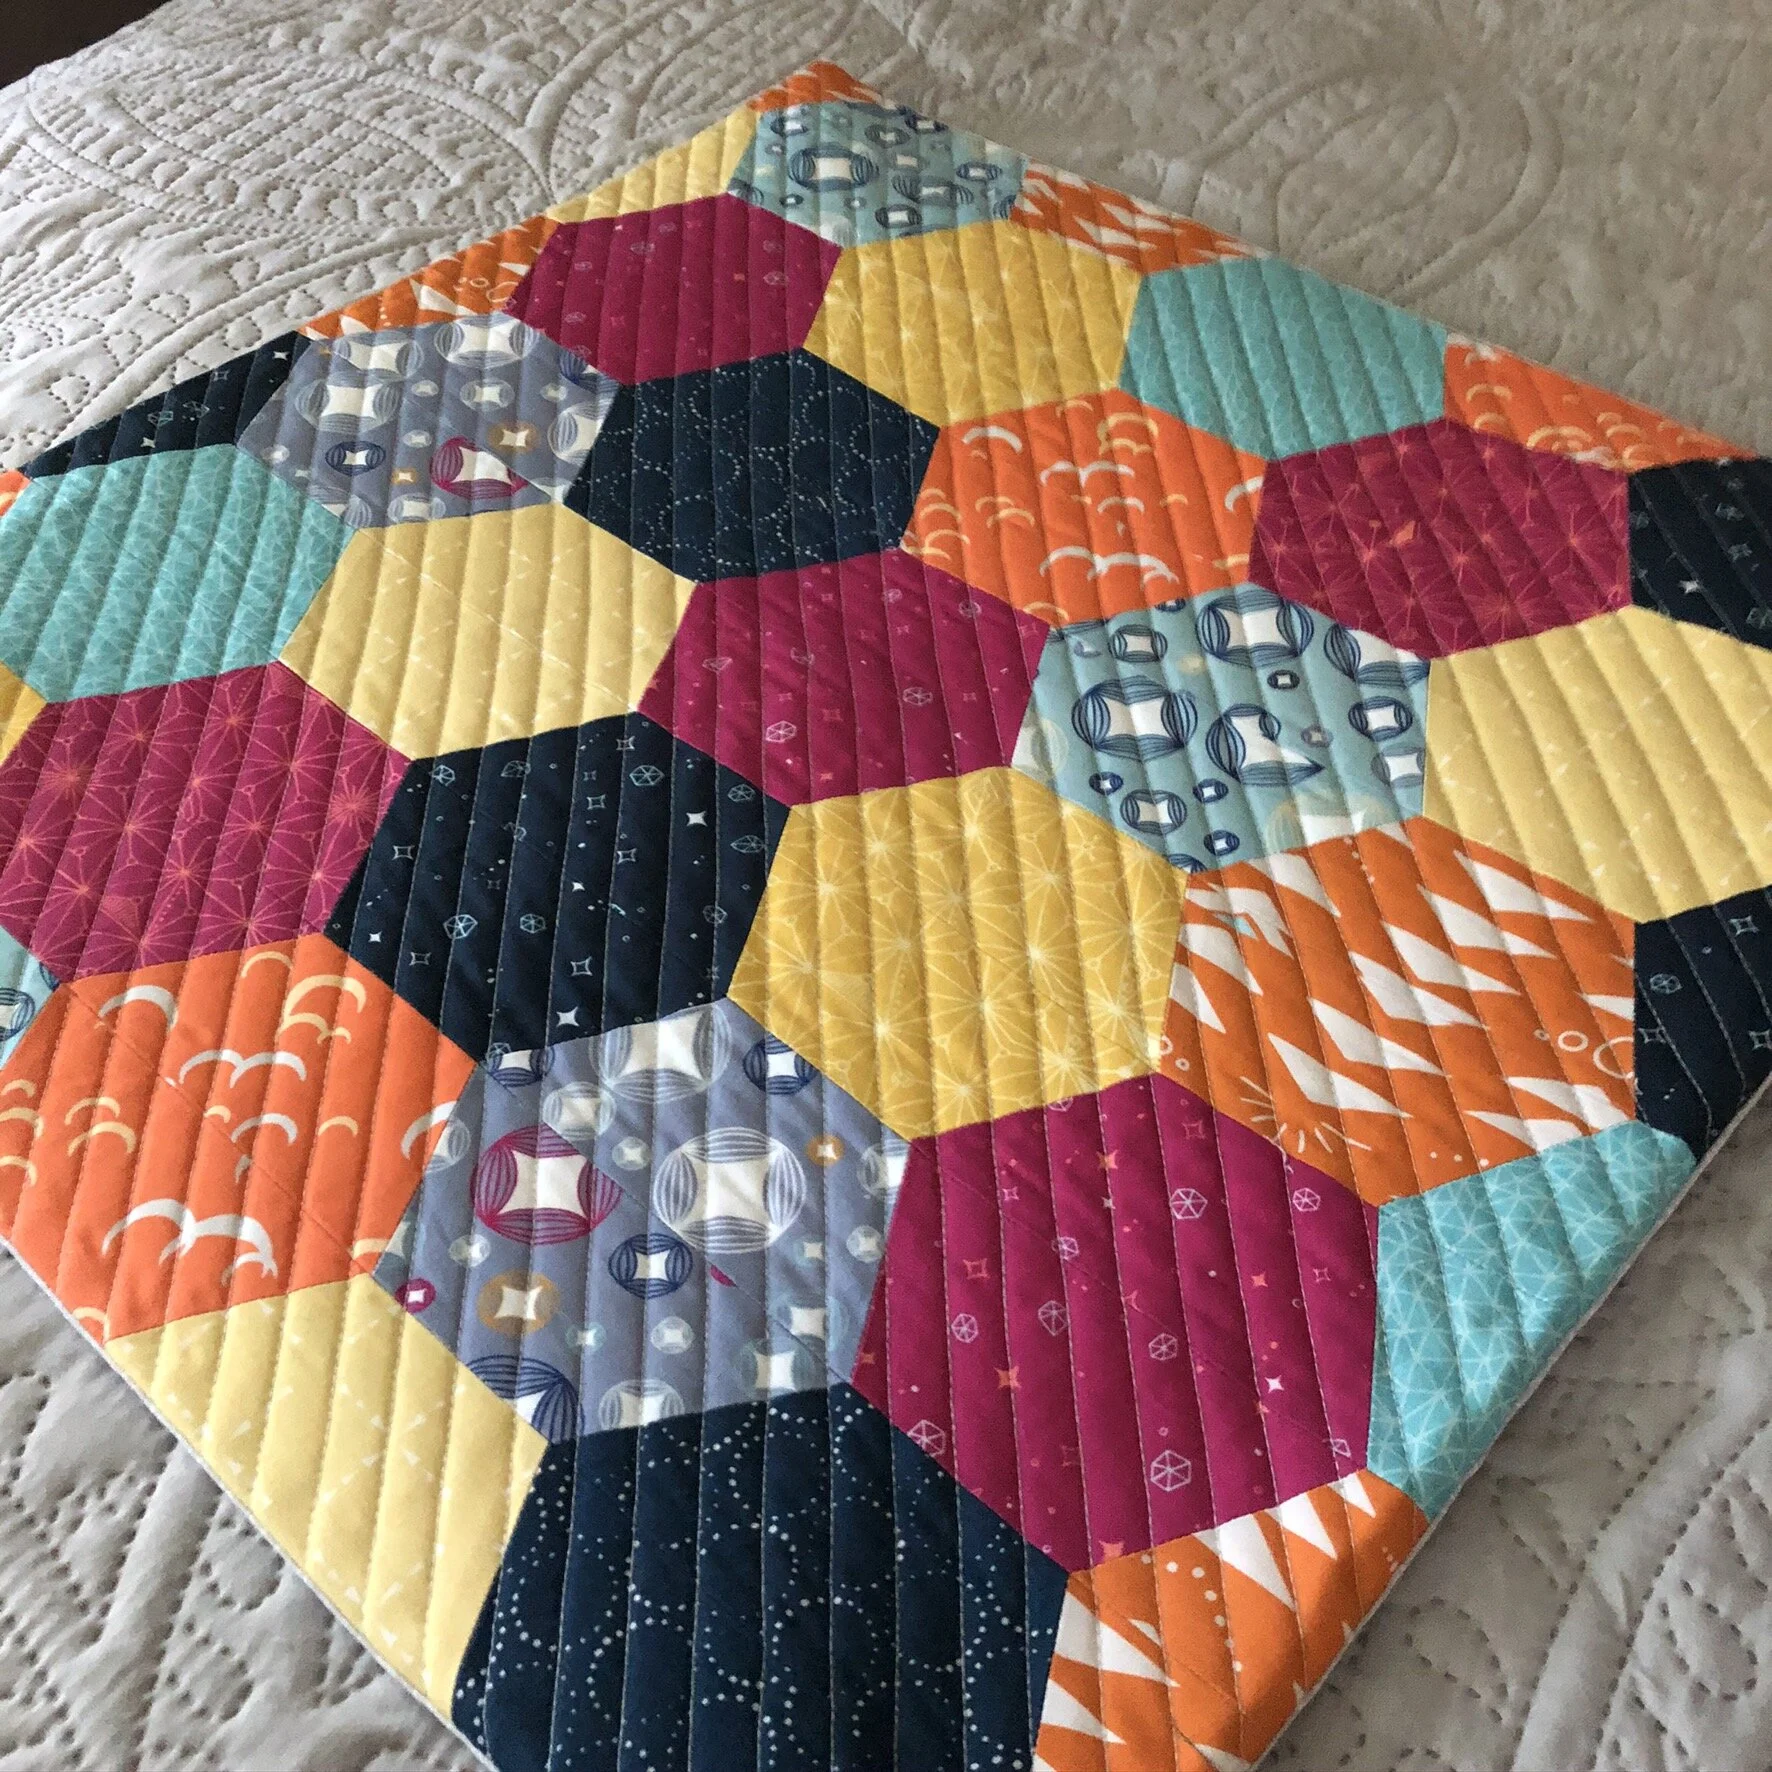
The next stop on the Journey 2 Nebular is Jawbreaker. In this pattern, we practice cutting strip sets and turning triangles into hexagons. I've pieced Jaybird Quilts Science Fair before, so I'm pretty familiar with the technique.

For this project, I decided to use some leftover strips from my Jelly Snowflake Quilt, The Christmas Card by Sweetwater for Moda. (Yay! Using up stash!) I'm sure I must have mentioned it before, but I have realized that jelly rolls are not my favorite pre-cut. No matter what, they seem to end up wobbly, plus the ones I've been using are slightly over 2.5," which isn't necessarily bad, but for this pattern, the size is essential.

I felt a little lazy, so I didn't want to deal with starching the pieces for this one, so I went with Best Press. It performs similarly to the starch that I use, but I don't have to wait for it to dry. I use the unscented because I'm quite particular about scent, and it works well. I laid my strips out as straight as I could get them, sprayed, and pressed. There's a little shrinkage, and it stiffens the fabric up a bit.

After that, I pieced the strips so I could get to cutting. I did have a bit of a mishap while cutting this one, and unfortunately, the accident wasn't the fabric. It was my finger. Don't worry; it's not a major injury. I try to be very careful when using the rotary cutter since I tend to be accident-prone. Before I cut, I make sure my hands are out of the way, everything is stable, and I have created the habit of closing my blade every time I'm done with a cut, even if I'm just shifting the ruler. I've seen too many Facebook posts in my quilting groups of slices, and I'm not good with blood! Anyway, I have a feeling it was coming. When I thought, "you know, I think it's going to happen today...I'm going to get cut," I should've just put the rotary cutter down and walked away. Not me! As I moved to close my blade with my right hand, my left hand decided to have a mind of its own and moved just close enough to the blade that it cut my index finger between my second and third knuckles. It was an instant, and all I could think was, "Oh no!" I immediately applied pressure after seeing how much it would bleed (not the best plan for someone who doesn't like blood) and went to grab a paper towel. I laid down and applied pressure for a bit. After a while, I checked it, and the pressure worked, and it seemed to stick itself back together. After that, I cleaned it up, applied my trusty antibiotic ointment and a bandage, and moved on with my day. It stung for a bit, about the same as a nasty cat scratch, but it's not too bad now.

Despite all of that drama, I managed to get my triangles cut. It's a pretty easy cut. After repositioning the ruler each time, you just have to make one cut.

IMG_2692.JPEG

I'm not sure which fabrics I'm going to go with for assembly, but I think I like this layout. I know the black stands out, but I really love the Christmas tree print, so I don't hate that it's a feature fabric. I have a week to decide!

IMG_2694.jpg

Sewcialites: Block 1

The day finally came! The Fat Quarter Shop released Block 1 of the Sewcialites Quilt Along this morning. I had all of my fabric starched and folded nicely, just waiting to be used.

IMG_2660.JPEG

I printed out the pattern and took a look at what I would need to know. It is designed by Lissa Alexander, and rated as an intermediate sew. It contains HSTs and hourglass blocks. Neither of those blocks is my forte, even using Triangle Paper from It's Sew Emma, but I'm looking at this whole project as a skill-building exercise and trying very hard not to get too stuck on perfection - a problem for me in my daily life.

As I reviewed the pattern, I used a tip that I've learned over the years while knitting sweaters and designs with multiple sizes. The sizes are usually listed in parentheses, and it's easy to get lost while you're knitting and knit to the wrong measurements. To prevent later aggravation, highlight or underline the size you're using throughout the pattern, so your eye is drawn to it. I went through the printed pattern and put a box around the measurements I would need to pay attention to.

IMG_2659.JPEG

After that, I went digging in my bin of Triangle Paper. Since I'm sewing the 6" blocks, I needed 1" Finished Triangle Paper, or a size close to it that I could trim down. I had 1" in my stash, so I unrolled it and peeled off what I needed for the HSTs in this pattern. I figured out what size of rectangle I would need in place of the cuts listed in the pattern for traditional HSTs. I went with 2.5" x 8". I cut out the rest of my pieces and labeled them with the Alphabities.

IMG_2664.JPEG

Earlier in the day, I watched Kimberly's Livestream, where she sewed the block and collected some tips. I was particularly interested in the final block assembly recommendations because I didn't want to lose my points or end up with a wonky-shaped block.

The tips worked! I haven't lost any of my points. As for squaring up my block, it's a HAIR larger than the 6.5" that it's supposed to be, but when I sew the whole quilt together, I shouldn't lose any of my points either. Hopefully...we'll find out in June. ;)

Journey 2 Nebula - Lucky Charm: Finished!

I am tickled! I finished the Jaybird Quilts Lucky Charm pillow, and I'm so pleased with it. Is it perfect? No. Does it make me smile? You bet!

IMG_2651.JPEG

After watching the video that Julie posted, I set out to sew the half hexies together. I've sewn hexies in Jaybird Quilt patterns before, but I cut them from a jelly roll strip, which means they lined up differently. Because I used 5" squares, the cutting didn't go exactly to the edge, but it was okay because it would be within the seam allowance. There were a couple of half hexies that I had to take the seam ripper to because they were VERY off, but you get a feel for where your pieces should line up as it goes, so it becomes easier.

IMG_2632.JPEG

I sewed each of the rows, sewed the rows in pairs, took those pairs, and sewed them into the completed top. Most of my points lined up exactly where I wanted them. A few are ever so slightly off, but it's nothing that I'm angry about.

I had visions of trying something exciting with the quilting, but let's face it, I wanted to get the project done, so I went with (mostly) straight diagonal lines. I used batting from my "bag 'o batting scraps." I'm pretty sure it's 100% cotton, based on the feel. The scrap was the right size, so I sandwiched it with some scrap white fabric and took to quilting. I did try to quilt it with some sparkly thread, which was not agreeing with me, so after only two tries, I gave it up and went with a pale gray.

The backing I used for this is also part of the Moongate collection. I like adding labels to my quilts, and I wanted to add one to this as well. I usually "design" them on my computer and print them on the June Tailor printable paper. I use design loosely since I'm not at all a designer, but they work. I don't usually add the date, etc. because I like having a collection of labels that I can use for whatever I need, so I just go with "handmade" and my name. I sewed this label to a scrap of fabric, turned it right side out, and then slid it into the folded over edges of the backing before doing the topstitching. I'm happy with it. It's enough to show that I made it, but doesn't get in the way of the pillow.

IMG_2638.JPEG

After quilting, my pretty-darn-square piece was very-not-square, so I squared it as much as possible without taking away from the design and stitched it to the backing.

I purchased a pillow form from Amazon since I don't have a backstock of extra throw pillows. It is QUITE fluffy. I wasn't expecting it to be this fluffy, but I love how it fills out the pillow. I did go with the 20" x 20" size, and I'm glad I didn't go for the recommended 22" x 22" because it would have been overstuffed.

IMG_2649.jpg

I'm so excited about this finish! Now, I need to clean up the sewing space and start on the next project on my list. This weekend, I'll probably prep my fabric for the next project in the Journey.

IMG_2647.jpg

Details
Fabric: Moongate by Christina Cameli for Maywood Studio
Thread: Aurafil 50wt; piecing: 2000, quilting: 2615
Batting: Unknown from the assorted scrap bag. Probably 100% cotton
Pattern: Jaybird Quilts Lucky Charm
Pillow: Foamily Premium Hypoallergenic Stuffer Pillow, 20" x 20"
Total Hours: 6 hours, 29 minutes

Sew Sampler Box September 2020

Guess what came in the mail today? If you saw the title, you already know. It's the September 2020 Sew Sampler Box from Fat Quarter Shop!

This month's box was slightly different from the usual box since the project is a bag instead of a quilt. It's a lovely little tote that would be perfect for carrying around my cross stitch projects. Bags aren't usually my thing, and I've never had much luck sewing them, but I'm drawn to this one and might try it out.

IMG_2609.JPEG

Here's what's in the box:
Petite Balboa Fat Quarter Bundle - Six fat quarters of the new Balboa by Sherri & Chelsi for Moda. I've been checking out the fat quarter bundle of this line for at least a month now, so I'm excited to have this mini version. Even if I don't use it for the included project, I appreciate it when the included fabric is fat quarters. So many possibilities!

Sewing Life Tea Towel by Gingiber - This cute tea towel has teal sewing accessories printed on it. Who doesn't need tea towels?

7" x 7" Silicone Appli-Fuse Mat by The Gypsy Quilter - I haven't done much applique, but this is designed to protect your iron from messy fusible!

Sew Mate Quilt Clips - These help manage your quilt sandwich when quilting on a domestic machine. We've already covered my woes of the tiny throat space on my machine, so I'm excited to try these.

Pack and Go Project Bag Pattern - Designed by Sherri McConnell, this bag uses some ByAnnie supplies to create a cute zippered pouch.

I like that there were some different products from what's usually in there this month. And, it's always fun getting quilty mail!

Recipe Review: Cinnamon Swirl Quick Bread

It's been so long since I baked anything; I was afraid that I forgot. Luckily, I have not! Yesterday, I had a go at Sally's Baking Addiction's September Baking Challenge, Cinnamon Swirl Quick Bread.

IMG_2589.jpeg

I love quick bread. Well, I love all bread, but a quick bread is one of my favorites to have on hand for breakfast. They're usually fun to make, reasonably simple, and often taste delicious. I've tried all manner of quick bread, from banana to apple to pumpkin to chocolate chip. I can remember when I was much younger (when I was old enough to use the oven with supervision), I would make quick bread with a Pillsbury mix. I'm certainly not opposed to mixes (I have several cake mixes in the pantry right now, and often have King Arthur Baking Scone mixes on hand, too), but these recipes are usually nearly as simple as a boxed mix.

I especially enjoyed this recipe. Obviously, I love the delicious taste and texture that comes from including butter, but sometimes I want to get to baking and not wait until the butter softens up. This Cinnamon Swirl Quick Bread uses oil, sour cream, and milk. Things I always have on hand! Because I was tired while baking, I didn't follow the directions to a T, and even then, the bread came out delicious. I appreciate that the recipe used weight measurements because I find it easier to weigh everything.

The cinnamon flavor in this is quite strong. Partly because it uses a full tablespoon, and partly because my preferred cinnamon is the Vietnamese Cinnamon from King Arthur Baking. It has a slightly sweet flavor and a delicious spiciness.

I'm definitely adding this recipe to the few I keep when I want to whip up a quick breakfast or snack.